I'm Going to Britmums Live!

Name:

I could tell you but that would kind of screw with the anonymity wouldn't it?

Blog:

Well you're here so presumably you know that then?

Twitter ID:

@TheBoyandMe

Height:

5'10" or 9". It does depend on how weary I'm feeling.

Hair:

Long highlighted blonde.

Eyes:

Normally red because I go to bed too late and wake up too early. If I had slept properly then they'd be a kind of grey/green/blue colour.

Is this your first blogging conference?

Nope, I went to Britmums Live! last year as well. I've also been to the Tots100 Christmas weekend and a Butlin's Ambassadors' weekend.

Are you attending both days?

Well I'm not going all that way for half an hour! Many thanks to my awesome sponsor Orchard Toys for allowing me to go this year. I couldn't be more proud to represent them, they're perfect for me.

What are you most looking forward to at BritMums Live 2013?

Seeing my blogging and twitter friends, catching up with them for more than an hour, meeting new people, building relationships with new brands, learning a bit in the sessions, stalking Kirstie Allsopp and hearing the woman from T.K.Maxx try and persuade me to wear a dress again.

What are you wearing?

I have no idea yet! Smarter on the Friday, but still casual. My Birkenstocks on the Saturday with comfy stuff! No-one cares what anyone wears anyway.

What do you hope to gain from BritMums Live 2013?

Chat to my friends, all of them. My biggest regret from last year is not talking to Kerry more; sitting in the T.K.Maxx lounge with her was the last time I saw her. And I miss her.

Tell us one thing about you that not everyone knows:

MY NAME! Mwha ha ha! But it's not going to happen!

Ok, something more serious? Um… nope I got nothing.

photo

I'm linking up to the 'Britmums: I'm going to Britmums Live!' linky.
Child Friendly DIY Designs (Guest Post)

If you have one or more children around the home, thinking up new activities for them to do can be hard work. That is to say finding activities that do not involve them spending hours on their Xbox or similar. DIY is a great way for them to keep active, use their brains and also for you to have a chance to bond with them. It can also teach them the value of hard work and reward. However, it can be tricky trying coming up with DIY ideas that are suitable for younger children; they are hardly likely to be rebuilding a supporting wall.

Here is a list of some great, kid-friendly, DIY projects for them to try.

Laying out the room

Redecorating your child’s room is the ideal way to get them involved in DIY. After all, they are the ones who are going to be spending time in it. Take some time to help them draw out plans of its layout and how they would like it furnished. Once the design has been completed, get them involved in helping to move things around and carry out various tasks, such as stitching curtains and putting together basic furniture. They will feel a real sense of accomplishment staying in a room they helped create.

Custom storage

There was a reason that create-your-own storage space came up so often on Blue Peter; it is fun and easy for children to do. If they are the creative type, whether it is writing, drawing or painting, get them involved in creating custom pen/paint storage using basic woods for the base and card for the pots. In addition to teaching them about the cutting, sticking and shaping of the materials, this also gives them the chance to get involve with painting the unit to suit their own tastes. Just remember to put down plenty newspapers before letting them loose with the paint.

Lighting

Before running off in a panic, there is no suggestion that you should get your six year old to change a light switch. Children tend to make a big thing of how their room is lit, which is great, as it gives them the chance to create their own custom lampshades. As with the storage unit, creating a custom lampshade will teach them the skills of crafting and shaping materials, as well as painting and decorating them. What is more, it is also a great way for them to get exactly the sort of lighting they want, whether it is dedicated to Justin Bieber or to Ben 10. It is also worth talking to your children about what sort of window shading they want; whether they would prefer traditional curtains or something different – for example, plantation shutter blinds.

Basic furniture

Creating basic furniture from soft materials is a great DIY skill for children to learn. Even a six year old will want nothing more than a beanbag to lie around on, so why not work with them to help create their own? All that is required is the right padding for the inside and a little help selecting exactly what sort of material and colour they’d like to make the outside from. It is then simply a matter of supervising them and helping stitch it all together. Again, taking the DIY route means they can have anything from a Man Utd beanbag to one dedicated to JLS.

image 2

Save

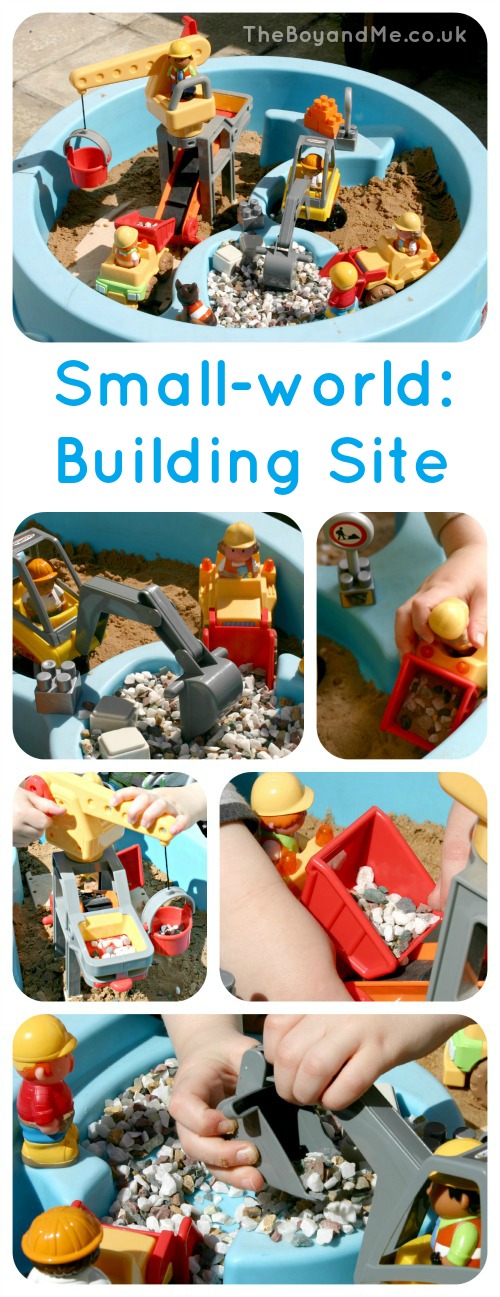
Small World: Building Site

Since discovering how good our Step2 water table is as a centre for Small World play, I've been keen to come up with different scenarios to stimulate his imaginative play. Using Happyland style toys has always been difficult for him, as it is for many other children. Contrary to popular belief children don't always know how to play, especially with imaginative toys promoting role-play; they do need guidance to show how they can re-enact situations they encounter. And likewise the benefits of Small World play are massive as it allows them to work through stories from books, real-life events or the concepts on a television programme for example.

When I set out a Small World scene, I usually have the characters doing something which prompts The Boy to continue their actions and provides a play opportunity straight away. I allow him to play freely for a short amount of time first of all before stepping in and (teacher talk now) 'facilitating his play', gently guiding the direction and providing him with scenarios to process. We play together for another five-ten minutes and then I step back and let him play freely.

He's still not great at engaging to be honest, and that might just be because he isn't geared towards imaginative play at the moment. However, I'm not going to stop providing him with the opportunities and encouraging him.

Small World: Building Site

I have used the Happyland construction site we've had for some time, along with a few other diggers that we have, and placed the crane on the lower level. I poured sand all around the bottom to hide the plastic base, then put sand on the upper level and a pile of gravel (this is actually spare fishtank gravel) in a corner to be moved by the diggers. I placed the various play figures and vehicles around the table, engaging each on in an action.

Small World Building Site

He had great fun with this and spent ages scooping up the gravel, pouring it into the back of a vehicle and then transferring this down to the crane.

In total this activity took ten minutes to set up, and provided hours of fun.

Kiddy: City'n'Move Stroller (Review)

About a month ago I was sent a Kiddy pushchair to review. Known for their carseats, it was a pleasant surprise to discover that they also made pushchairs, and as I've been using a Maclaren Techno XLR since The Boy outgrew his beloved iCandy Cherry, I was extremely interested to see how the City'n'Move would compare.

This review is heavy in photographs, but I want to show off as many different aspects as possible which is something I look for when researching a product. I must also apologise for some of the poses from The Boy; he was in a silly mood!

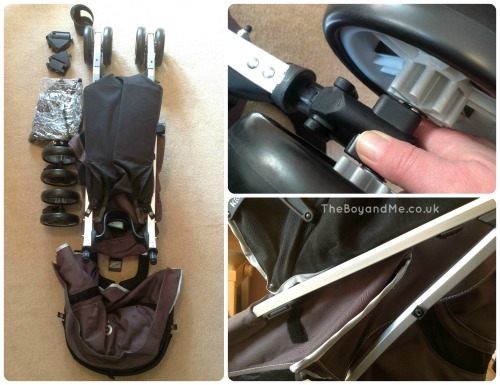
Assembly of the Kiddy City'n'Move is simple: the pushchair comes put together apart from the front wheels which slot into brackets and click into place; the hood slots into brackets on the side of the frame, there are metal studs on the fabric and frame that clip together and velcro strips for added adjustment; and the drinks' holder slots into an unobtrusive clip on either side of the frame. As The Boy insisted on helping me assemble the pushchair, it took slightly longer than necessary but was put together and he was wheeling it around within five minutes.

Kiddy City'n'Move

Once assembled, The Boy couldn't help but wheel the stroller around the house and then climb in. I'd explained that we were testing it and he was desperate to show off the features. So in he climbed to show the way that the seat has four different positions:

Kiddy City'n'Move

And that the protective-lined hood is so much better than the standard pushchair, mainly because it has an extendable hood with an integrated window to check on sleeping little ones:

Kiddy City'n'Move

Other aspects of the Kiddy City'n'Move to note are:

  • extendable leg rest: as The Boy is at the end of the age range to use this pushchair, we have the rest extended to make it more comfortable for the length of his legs. Obviously for older babies and toddlers, it could be extended to support their legs whilst sleeping;
  • ease of opening/closing: there is a wide plastic bracket on top of the hinges to push down to open the pushchair, attached to this is a handle at the top to pull up on and close the pushchair working in conjunction with the push lever on the side;
  • safety straps: the Kiddy City'n'Move features a five-point harness with wide protection pads over the shoulders. The straps are easily adjustable in length and each shoulder strap clicks into place separately (much easier than the Maclaren). There are also slots on the back of the seat to adjust the position of the straps for different height children, and these are far more accommodating of taller children than in a Maclaren pushchair (The Boy is 3 years 11 months and 106cm tall).
  • safety bar: there is a padded, metal safety bar which should be used at all times. I'm afraid that I don't have it on the pushchair in these photographs, however the image on the website shows how it looks. It fixes in on one side semi-permanently and there is a slot for it to attach into on the other side. A push button underneath allows it to open like a door for the older child to climb in and out. It also does not need removing when the pushchair is folded down as there is a hinge in the middle.

Kiddy City'n'Move

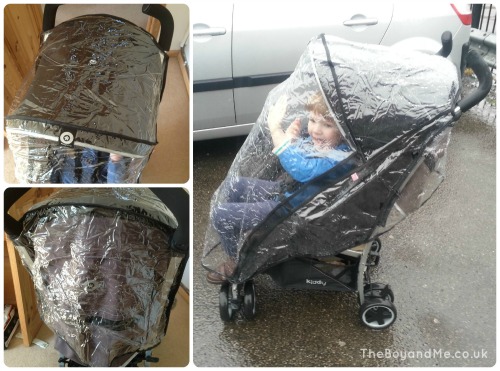
One aspect of this pushchair that I am incredibly impressed with is the raincover. I know it's not a very exciting concept but having coped with the (admittedly easy to fit) raincover on the Maclaren which then leaves a sodden pushchair, I was very happy to see that Kiddy have designed the raincover to fit over the entire pushchair, hood and all. There are two slots to put the handles through and they are the only things that get wet, as even half of the back is covered. I had a good chance to test this today as we walked for twenty five minutes in the torrential rain across town to pick up my car from the garage. I was saturated; my jeans were sticking to me and I had water running off my face. However, The Boy sat comfortable and dry inside the City'n'Move which also remained dry as a bone.

Kiddy City'n'Move

The only thing that I found slightly irksome about the Kiddy City'n'Move is the shopping basket. While it is large enough to accommodate the groceries from a trip to the town centre and a change bag, unfortunately the umbrella-folding mechanism is not below the basket but above it. This effectively means that the basket is divided into four sections when putting items in it. This may be something that just bothers me, but it was part of the criteria for a pushchair when we first had The Boy.

However, all the positives of this pushchair far outweigh the logistics of loading up a shopping basket; it's roomy, airy, comfortable, with a sensible closing mechanism and raincover. And I can't rave about the extendable hood enough! What's more is that The Boy prefers it! I asked him to try out both this and the Maclaren and he prefers the Kiddy every time. And in all honesty, so do I! It's a good looking pushchair, and very comfortable to push.

Furthermore, it passed the Nana test (she took charge in Cardiff city centre and she's used a fair few pushchairs in her time with four children and seven grandchildren) with flying colours, having been bumped up and down several stairs, pavements and steered around groups of dawdlers.

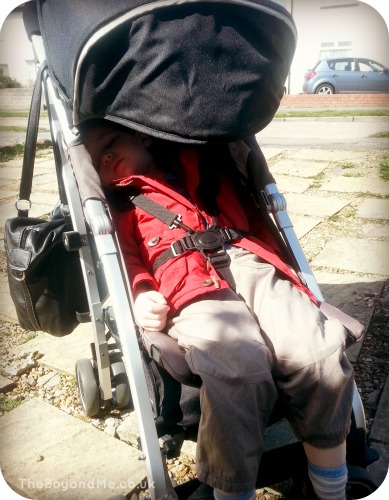
The best indication that this is a good pushchair is this though…

Kiddy pushchair

…he hasn't fallen asleep in a pushchair for nearly 18 months.

Suffice it to say, we haven't actually used the Maclaren since we received the Kiddy pushchair and when we go on holiday in a few weeks, the City'n'Move will be the one we take with us.

I was sent this item for the purpose of this review, my opinion is honest and unbiased.

Creating The Perfect Craft Room (Guest Post)

With the revival in recent years of crafting as a hobby, having a dedicated space within the home where both adults and children can enjoy pursuing various crafts is a great idea. This will ensure that other areas of the home are free from the all the paraphernalia involved in different crafts and become something of a bolthole for those who are enthusiastic about their hobby.

Which room?

Not everyone is lucky enough to have a room to set aside for a hobby but there are ways of creating this extra space if needed. A summerhouse in the garden that is properly insulated can be used for crafting all year round, or a box room can easily be converted into a studio. If the room is to be used for more than one person then a spare bedroom is the obvious choice for a crafter’s room.

Once the room has been chosen it is necessary to think about some of the essential facilities that it is going to need. If the craft makes use of electrical equipment, such as sewing machines, are there adequate power points? Is there enough natural light getting into the room? All of these points are important and if the space available does not meet the criteria then it is a good idea to think about alternatives. Can the room be rearranged so that the power sockets are more conveniently placed? Can lamps that simulate daylight be used in addition to the existing natural light?

Furnishing a craft room

One of the main points for a craft room is adequate storage. Adequate cupboard space is essential and a drawer unit is a good idea, particularly if the room is being used for more than one craft. Everything can be organised and kept separately until needed. It also ensures that at the end of the day everything can be tidied away properly and found easily again the next day.

A large workspace is also going to be needed, particularly if more than one person is using the room. Dining tables are a good choice for a workspace as they can seat several people and offer plenty of space to work on, no matter what the craft choice.  They also tend to be fairly easy to clean but can be protected with waterproof cloth if needed.

Craft essentials

There are many different options depending upon the type of craft that is chosen. Children’s crafts will inevitably include items such as paints and various different types of paper, but added to this can be crafting scissors (child-friendly of course!), decorative paper punches, paper glue and stamps. For children, opt for the long rolls of plain paper as they last for a long time and are not expensive to buy.

Other craft essentials might include lamps to help out when natural daylight is not enough, a sewing machine, fabrics and yarns. Ensure that everything that might be needed is to hand as there is nothing worse than getting halfway through a project and discovering that it cannot be finished!

image 2

The Bottom Of My Garden

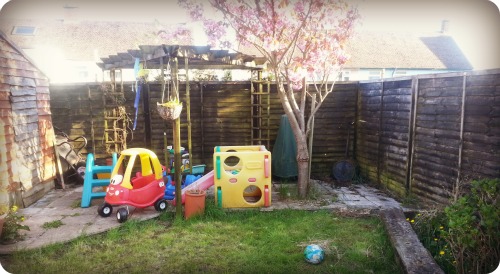
This is the bottom of my garden…

20130505_184844

…and I am deeply unhappy with it.

In theory it's a great area; a decent sized patio, a fabulous triangular pergola (I'm still in awe of my husband for working out how to build this, and then doing so), a beautiful cherry blossom tree, sheltered from the wind which blows up the 'tunnel' created by living in a long street of parallel houses. All of these things should mean it's a perfect area and it's certainly what I had in mind when I designed it.

However, as you can see it's a dumping ground. The Boy is far too big to play with those toys and we have nowhere else to put them. And because I'd like to grant him the joy of a sibling at some point, I refuse to get rid of them. Therefore they stay cluttering up the bottom patio and being no good to anyone. Furthermore, it doesn't get any sun and as a result it's not the idyllic space I'd hoped for. And that cherry tree has pushed up the paving slabs around it.

So you can see that it's just a space which is. And it's a waste.

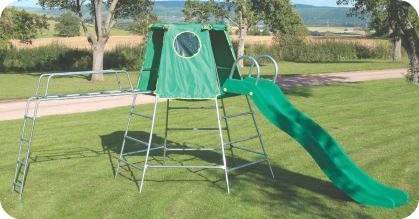
I am planning on changing the garden around (yet again) in light of the fact that The Boy now has no climbing equipment in it. Well he does, but I'm not entirely sure that climbing up the side of the slide is the correct use for it. Nor is that what a swing is for. And so I've been investigating climbing frames which might be suitable for him and not take up too much space in the garden, although the only problem is that they unfortunately do take up a lot of space because an allowance has to be given for 'fall space'.

explorer 2

If only you knew how many times I've stood in the garden trying to work out how to fit it all in without changing too much of the structure.

Mr. TBaM and I have come to the conclusion that the best place would be along the side of the garden (as he still needs lawn space to run around and play ball games in), which means that we need to relocate his Little Tikes house from the beautifully laid, year old patio in the same spot. It's going to go down to the bottom of the garden on half of the patio above, the other half of the patio has already been taken up to provide the tree with more space for its roots, and to relocate the compost bin.

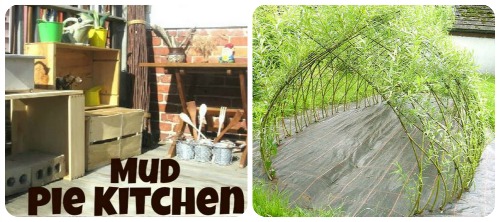
I'm also looking to set up two more things down in newly reclaimed area of garden; a mud pie kitchen and a willow den (somehow incorporating the trunk of the cherry tree).

garden

Mr. TBaM has no idea that I want to build a willow den at the bottom of the garden, but I think it's a fun thing to have and I can just imagine The Boy sitting and reading his books in it in the future.

And did I mention that he's having a party in the garden for his fourth birthday in a month. And of course I want it finished by then.

Wouldn't you?

LifeProof iPhone 5 Cover (Review)

I was recently sent a LifeProof iPhone 5 cover for Mr. TBaM to test, which he was very excited about it. He's been testing it rigorously for a month and here are his thoughts.

I've been using the LifeProof cover on my iPhone 5 almost exclusively for the past month, and have had virtually no problems; the touchscreen doesn't appear to lose sensitivity even when playing Fifa 13, although for understandable reasons the sound is slightly muffled at higher volumes when watching shows on iPlayer. All other buttons work as they should, even the mute slider, and the recess for the home button is positioned with pin-point accuracy. It has gained a small scratch, but it's only noticeable when the screen is at its brightest, and it's better being on the case than on the phone itself.

But this cover isn't just an everyday cover; its value is in protecting a £500 phone from water, snow, dirt and shocks.

With the Boy's birthday fast approaching, I'd been given the task of rearranging parts of the garden. It's a messy job that included moving a compost bin, so with the current lack of snow and my unwillingness to drop my phone from height it seemed like the easiest way to test the remaining protections.

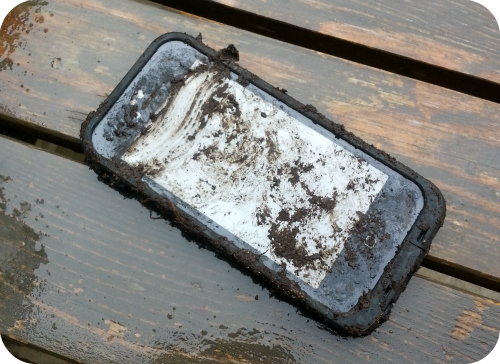
With several hours of podcasts queued up, phone and case followed me around all afternoon. A bit of drizzle ensured it soon gained a light covering of mud – the photo below captured it about half-way through the afternoon, and it only got more and more caked!

LifeProof iPhone 5 cover

So how well did it work? Well, faultlessly. LifeProof includes a protection programme that, for a small fee to cover service charges, will repair or replace any device that is water-damaged whilst in one of their covers, but there was no sign afterwards that I was at risk of needing to take advantage of this.

After all that I put it through, it seemed only fitting that I clean it off properly and return it back to its normal state.

All that remains is to see if I can persuade TBaM that I need the LifeProof bike mount to go with it!

I received this product to review, our opinion (that it's fab!) is honest and unbiased.

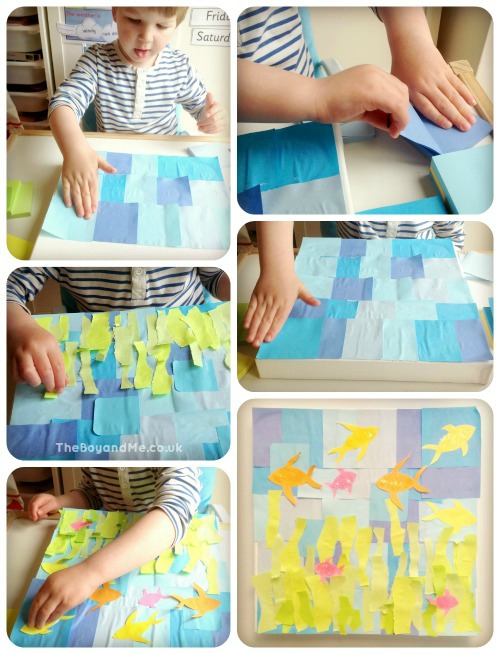
How To Make An 'Under The Sea' Picture (Using Post-It Notes)

As a teacher I know only too well the worth of a sticky bit of paper for note-making. Before I had The Boy, my desk was organised with coloured Post-it notes, and they are also an excellent resource to use in lessons during collaborative discussion work.

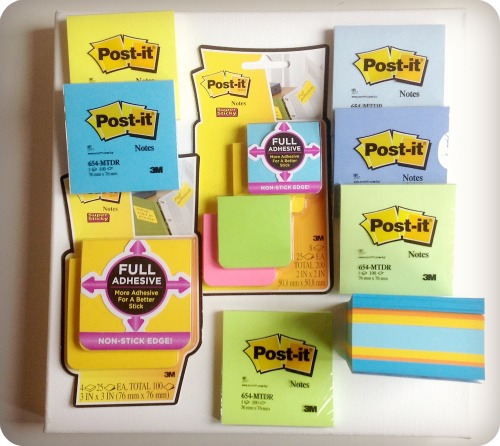
However, I'd never thought of using them to create a piece of art with The Boy until I was asked by 3M to see what I could do with their new Post-it Notes Colour Cubes, packs of Post-it Notes in a range of vibrant hues. They sent me a selection and a canvas and asked me to get creative on a "miserable rainy day when no one wants to go outside!" How fortuitous that today happened to be just one of those days.

 post-it notes colour cube

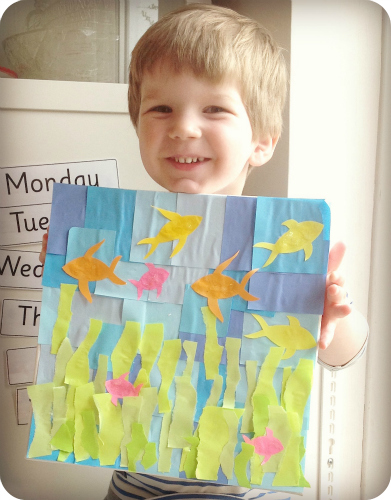
So faced with this wonderful range of bright coloured Post-it notes, mostly shades of blue, The Boy and I decided to make an 'Under The Sea' picture.

  1. First, we layered the different shades of blue all over the canvas (we did have to use a small amount of PVA glue as the canvas was the most resistant surface in the world!)
  2. We also used the smaller packs of Super Sticky fully adhesive Post-it notes to add some variation in the colours.
  3. Next we ripped up the different shades of green to make seaweed and underwater foliage and layered these from halfway down to the bottom, overlapping to add depth.
  4. Finally I used the brightly coloured pink, orange and yellow Post-it notes to create some fish, by drawing a design on the back and cutting them out. The Boy then placed these in between the leaves and swimming freely about in the water.

Post-It Notes Colour Cube
And there we have it; one canvas (or piece of card), a selection of Post-it notes in different colours, one hour and one very happy little boy.

post-it note art
If you're looking for some more ideas on creating art with sticky bits of paper, have a look at the Post-it UK Facebook page, which includes some excellent examples.

This is a sponsored post in connection with 3M.

365 #19

Show me your blue skies, show me your outdoor play, show me your week (even if it was inside)!

This linky only works because of people linking to it and then contributing their thoughts to others' posts via comments. I can't emphasise this enough, it's the whole point of the linky!

Join in by entering the URL of your favourite photograph of the week (either a 52 or a 365 photo) and show some comment love to everyone else in the community. We've got a Facebook group, and now I've created a collaborative Pinterest board (if you'd like to collaborate, let me know and I'll add you).

  1. Choose your favourite photo from the past week and link it up below.
  2. Please add the badge to your linked-up post so that other people know how to find all the other fabulous entries.
  3. If you can spare five minutes to comment on a few other entries I know they'd appreciate it!
365


I've been 'shortlisted' for the Photography category in the Britmums Brilliance in Blogging awards. Many thanks to all how nominated me, if you could spare another minute or so to vote for me then I'd be really grateful! Just click on the badge below to be taken to the voting form.

NOMINATE ME BiB 2013 PHOTO

Days 125-131 of Project 365

125-131 of 365

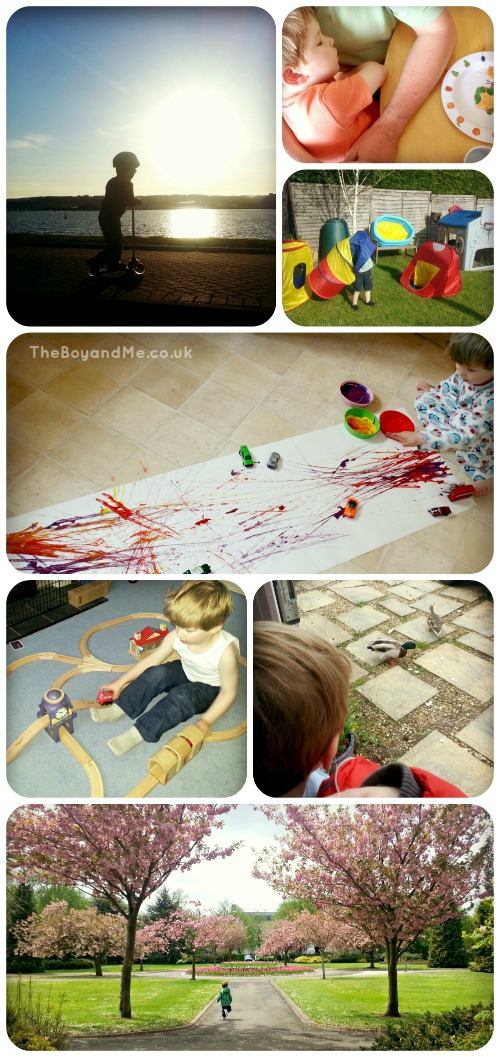
125. Silhouette (Earlier in the day Mr. TBaM and I had sold at a car boot sale, and we followed that up with a trip across the barrage to the Bay for some very special celebrations. Today was the day that Cardiff celebrated its football club returning to the premiership, something it hasn't experienced for fifty years. There was a huge event down in Cardiff Bay with tens of thousands of supporters and proud Cardiffians alike. Secretly we were only after catching a glimpse of Alex from CBeebies who made The Boy very happy with a wave and a thumbs up! We then walked back across the barrage to watch the amazing fireworks.)

126. Crash! (Monday was a stunningly beautiful day. The buzz of lawnmowers, sizzle of barbeques, shrieks of laughter from children splashing in their paddling pools and the buzz of the honey bees filled the air. We entertained friends that we hadn't seen in four years; I was four months pregnant with The Boy when we last saw them. I was going to show a photo of The Boy watering the garden wearing an incredibly cute straw hat, however this one topped everything. He settled down to eat his cheese on toast, asked daddy for a cuddle and within thirty seconds he was asleep!)

127. Hide and Seek (The day was milder than it had been over the weekend but still sunny, especially late afternoon. We spent the morning trying to find some Summer shoes for The Boy, which is the reason it's rained on and off ever since! When Mr. TBaM got home from work, he and The Boy had a mad hour in the garden playing hide and seek.)

128. Choo choo! (A shorter than usual INSET today meant that I was able to get home and play with The Boy more than I usually can on a Wednesday. I made this super train track, with plenty of space for the station master to sit and command the rails.)

129. Zoom! (I set up a free painting session for The Boy to get to grips with after breakfast but he couldn't wait to get to grips with it! Car painting is the easiest painting around, minimum effort and maximum fun!)

130. Quack! (We got home at lunchtime after finishing school and nursery, only to find a pair of ducks on the drive. They've been around the neighbourhood for about a week or so, but are starting to wander into gardens now. I phoned the local nature reserve and was told that they're 'wild' ducks and unless hurt (in which case phone the RSPB) then leave them alone. Apparently in the mating season they often take themselves off in pairs for peace and quiet. We probably shouldn't have fed them, but I The Boy was worried they may be hungry.)

131. Pink Snow (We nipped into Cardiff for a review of Wetherspoon's new menu and parked near the Civic Centre, which has a beautiful park full of cherry trees. All were in full blossom and as The Boy ran through the park, the strong Spring wind showered him in pink blossom confetti.)

TheBoyandMe's 365 Linky
MWTWbadge
akiltandacamera.com

Related Posts Plugin for WordPress, Blogger...