Engineering With Aluminium Foil (STEM Activities)

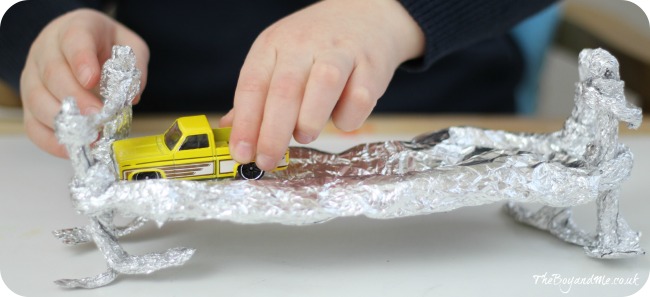
Every time we cross the Second Severn Bridge to England, The Boy is fascinated how a 1km long road can be held up by two posts 'and a few wires'. He's asked a few times if we can make a bridge like it, and I'd seen an idea recently about using aluminium foil to construct with so decided to combine the two together.

Engineering Activities for Children

[Read more…]

Elmer The Elephant Maths Activities (Free Downloadable)

Number bonds to ten and twenty are an important thing for infants to understand and learn. Practise, practise and more practise is the key to ensuring that children are able to remember them so that the answers just come instinctively, but worksheets and endless sums are boring and offputting.

We've recently discovered the wonders of Elmer and I thought it would be great to create our own colourful elephant using a key and sums with answers between 10 and 20.

Number bonds to 20

[Read more…]

5 Easy After School Play Activities

Ever since The Boy started school, I've missed many parts of our daily routine especially the spontaneous play sessions. Once home from school, he tends to collapse on the sofa with a snack and drink, watching television for a little while, and I realised quite quickly that it would be very easy for it to suddenly be tea time and not have had any time together doing anything.

As a result I have started setting up a play invitation for him to explore, nothing challenging or requiring any detailed levels of concentration, more activities that allow sensory exploration. I think he finds them quite therapeutic, exploring different textures, drawing patterns and allowing his mind to wander as he plays.

5 Easy After School Play Activities

Play Activities

  1. Tiddlywinks: I used transparent counters, painted some wooden numbers and place them in different sections. Each tiddlywink that lands in that section scores that point. The Boy loved working out his score after we'd played, and yes he beat me.
  2. Decorate The Line: I drew a wavy line on a piece of A4 paper and provided a choice of different coloured sands, beads and sequins to decorate the line as he saw fit.
  3. Pom-Pom Pick-Up: Pom-poms of different sizes amd colours, and large tweezers. This gives the potential for the child to sort them (if they want to) into colours or sizes.
  4. Coffee and Cinnamon Sensory Play: Based on this sensory play activity, I let The Boy explore the different scents from the coffee, cinnamon and dried oranges.
  5. Curious Conkers: It's Autumn and that means conker season. Would work well at any time of the year with flowers, seeds etc.

All of these items are resources that we had lying around the house (or garden). The partitioned plate is one of three that I bought for The Boy's birthday party food last year from Asda. The large tweezers are from Amazon and the coloured counters for tiddlywinks from eBay.

Mirror-Based Sensory Play

I take no credit for this play activity whatsoever! I was reading a wonderful learning through play post from Happy Hooligans last week which used a mirror as the play surface for sensory play. A wonderful play idea, Jackie suggests taking the mirror outside to show the reflections in the sky. Today it was pouring down, so funnily enough I wasn't too keen to do that, and set up inside by the window instead.

Sensory Play On A Mirror

I had a plastic tray that I've used for parties before, and I decided to fill it with natural and scented items all in an Autumnal tone; ground coffee, whole coffee beans, pebbles, shells, dried orange slices, conkers and cinnamon sticks. I also provided large tweezers, spoons, a funnel and cotton wool buds. I set the mirror onto the play table that we use to give The Boy a steady and secure base, and located it in a window for ample natural lighting.

"Can you smell it in the house, mummy? It's filling the house!"

Straight away The Boy went for the cinnamon sticks, intrigued as to what they were. He sniffed them, scratched them, rubbed them together and commented on how doing that released the smell.  He was utterly bemused to learn it was the same thing as we had used in cakes the previous week, and decided to pick up some ground coffee with it and compare the scent.

Mirror-based sensory play

He then became intrigued with mixing and pouring the coffee beans together with the ground coffee. The Boy started using the funnel to pour the ground coffee into the beans but then tried the beans into the coffee instead, he soon realised that they were too big to fit through the hole. The tweezers proved a bit of a challenge for him when trying to pick up coffee beans, turns out rounded objects are a bit tricky! In the end he used his fingers, and then a cockle shell to scoop up the ground coffee, and a cinnamon stick to mix the beans and grounds together. He loved pouring it into the whelk shell, watching it roll around through the spiral and then pour out the bottom.

Fine Motor Skills

"You make a maze, Mummy. And don't forget the dead ends!"

Pouring the coffee grounds onto the mirror, he chose a cotton bud to trace patterns in and then practised some letter formation. That soon seemed a bit too much like school so he then asked me to draw a maze in the coffee, with the all important dead ends. This is a great way to practise pre-writing skills and the pencil grip. The Boy also noticed that if he looked through some of the coffee into the mirror it looked like he was a different colour.

Pencil grip

"It sounds like music, like clapping. And listen, this is fast like raindrops."

The cinnamon sticks proved a huge hit, in more ways than one! The Boy really liked the sound they made when banged together, and then he decided to pour the ground coffee and the beans to see which made the loudest noise. Of course the best thing that made a sound was the magical seashell that he could hear the sea through!

Mirror-based Sensory Play

"I want to make a tower like they did on Tree Fu Tom!"

I asked The Boy if he could make a pattern with the shells, I thought he might have made a flower or have sorted them. Instead he laid them out in a row, one up and the next down, repeatedly. Then he asked what he could use the pebbles for, which I turned around on him, and he suggested making a tower and seeing how high it could reach. He very quickly remembered about choosing flat stones to rest on top of each other, and persevered until he managed five high!

Building a pebble tower

I was amazed at how well this activity went with The Boy, especially as I've never given him much sensory play in the past as he doesn't like gloop or mucky hands. This has shown that he can explore the senses without becoming mucky, and that actually he got a lot out of it. I gave it to him when he'd been in from school for about half an hour and, as my husband pointed out, he seemed to find it very therapeutic as it didn't need a huge amount of concentration and he could explore at his own pace and in his own way.

 Mirror-Based Sensory Play

Seashore Sensory Table (Learning Through Play)

A few weeks ago we went to Oxwich Bay with my brother and his family for a day on the beach. It was a brilliant afternoon, and one that will definitely go up there as a highlight of the Summer due to the relaxed free-range play that The Boy and his cousin enjoyed, while my brother searched my cockles on the water's edge. However, for me the best part was exploring the rockpools with my sister-in-law who works in outdoor adventure activities and has received training in 'Beach Schools'.

The lesser known 'Beach Schools' don't seem to have the recognition or accreditation that 'Forest Schools' do in the UK, which is a particular shame as the entire country is surrounded by the most wonderful coastline. My sister-in-law was eager to pass on her training to us and show The Boy all about the wonderful creatures which live in rockpools. He was fascinated, as was I, and so I decided to take our learning home with us.

I half filled a bucket of water, collected a variety of shells and seaweed specimens and set them up in our trusty Step2 water table which has two tiers. Into the bottom I placed sand and the shells, the top level had seawater and the seaweed.

Then I invited The Boy to play, and learn.

Seashore sensory table

The cockle shells completely fascinated him! He compared them to castanets and tried to play music with them. He noticed that one hadn't opened properly and examined the creature inside (brought home in error!). Then he made imprints in the sand with the cockle shells and noticed the ridges, and how they joined together perfectly.

Next I presented The Boy with a shell identification sheet and he started trying to match up the shells to the animals which have them as homes.

Seashore sensory table

The sheets which my SiL gave me are aimed at older children (who can read), however the illustrations are so clear that it's easy for younger children to use them with an adult to read to them. The Boy was fascinated with the identification sheets, and quickly noticed the one for seaweed trying to work out which seaweed was bladder wrack etc.

Seashore sensory table

This was an excellent learning experience for him, and one which will be easy to repeat in situ next time (as we've laminated the guides) we go to a beach. We happened across one last week while on holiday, and he was fascinated with the limpets and muscle shells we saw covering the rocks.

Seashore Sensory Table

Identification Sheets:

How To Make A Stick Raft (#43)

Making a raft is an easy activity to do with children, although their age determines exactly how much input you give. The Boy is four years and two months old and quite good with fiddly and intricate things, but making this raft was more about him helping me, than me helping him. Now he knows how to do it, the situation will reverse.

This activity is completely organic, both in the way that it happened, and the materials we used!

How To Make A Stick Raft

You'll need:

  • 4 sticks of equal length for the frame
  • around 8-10 sticks of the same length as those for the frame to create the bed of the raft
  • long grass reeds/stems
  • 1 large leaf or a frond of leaves for the sail
  • 1 stick for the mast
  1. Lay the four sticks for the frame on top of each other to judge size. Carefully wind a long grass reed around each of the join, overlapping and winding from one corner to the other. This will hold them in place. Complete for each corner.
  2. Once the frame is completed, fix each stick to the frame to make the bed of the raft, winding the grass over in a cross fashion as above. Continue until the base is covered, there will be gaps in between each stick.
  3. Use one stick as the mast and a large leaf as the sail. Make two small holes to push the mast through. We actually tied a large frond of leaves to the mast instead.
  4. Insert into a gap in between two of the sticks, carefully wrap grass around to fix it into place.
  5. The raft is ready for sailing!

How To Make A Stick Raft

  • This activity is great for:
    • fine motor skills and hand-eye co-ordination; winding the grass around the sticks.
    • design skills; How can we join the sticks together?
    • problem-solving; Did the raft float or sink? Why? Did it get caught on anything?
    • communication; questioning and discussion.
    • self-esteem; achievement!
    • having FUN!

It is also one of the activities on the National Trust 50 Things To Do Before You're 11&¾ list: #43: Build A Raft!

Country Kids


Related Posts Plugin for WordPress, Blogger...