Mirror-Based Sensory Play

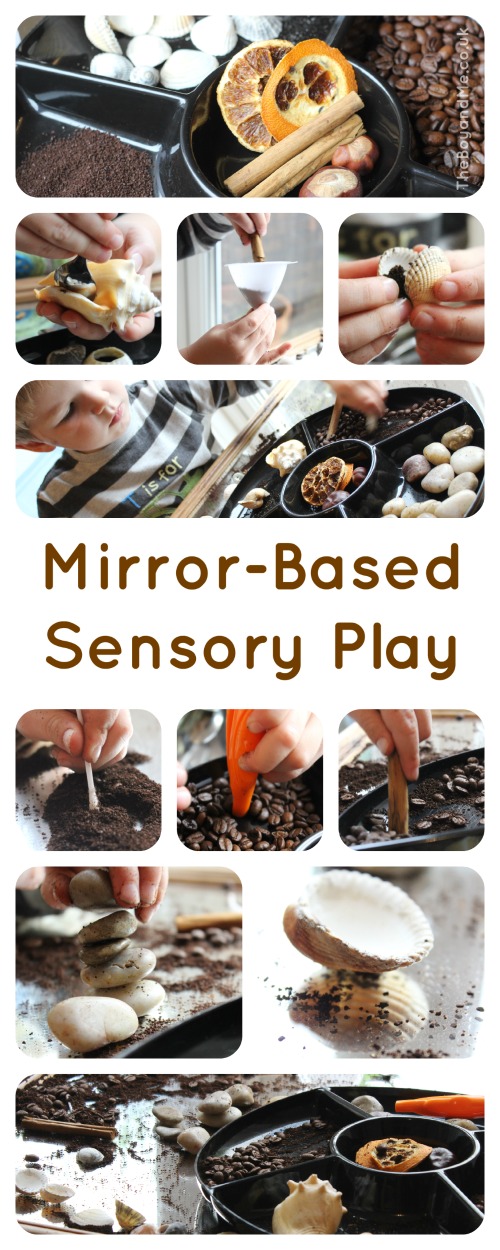
I take no credit for this play activity whatsoever! I was reading a wonderful learning through play post from Happy Hooligans last week which used a mirror as the play surface for sensory play. A wonderful play idea, Jackie suggests taking the mirror outside to show the reflections in the sky. Today it was pouring down, so funnily enough I wasn't too keen to do that, and set up inside by the window instead.

Sensory Play On A Mirror

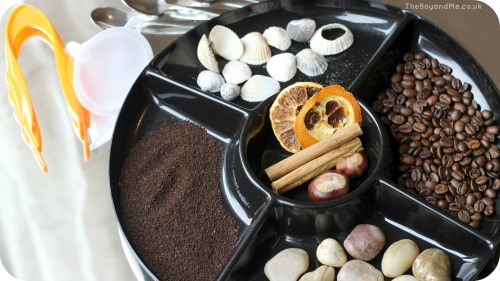
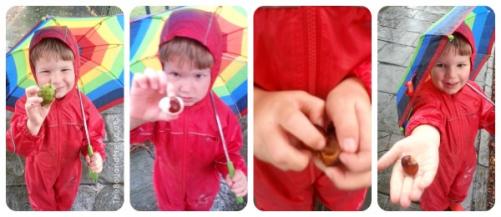
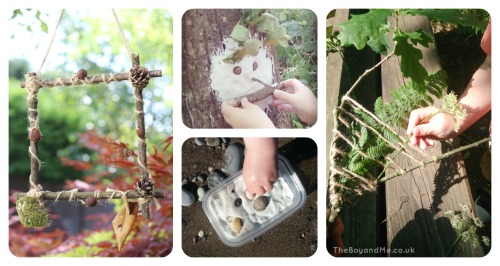
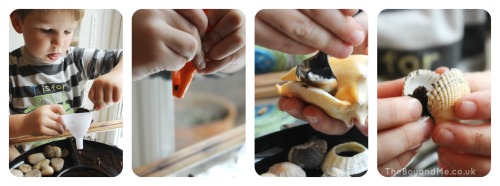
I had a plastic tray that I've used for parties before, and I decided to fill it with natural and scented items all in an Autumnal tone; ground coffee, whole coffee beans, pebbles, shells, dried orange slices, conkers and cinnamon sticks. I also provided large tweezers, spoons, a funnel and cotton wool buds. I set the mirror onto the play table that we use to give The Boy a steady and secure base, and located it in a window for ample natural lighting.

"Can you smell it in the house, mummy? It's filling the house!"

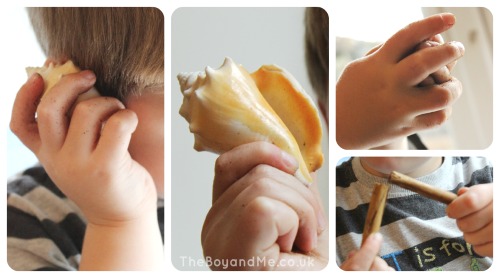
Straight away The Boy went for the cinnamon sticks, intrigued as to what they were. He sniffed them, scratched them, rubbed them together and commented on how doing that released the smell.  He was utterly bemused to learn it was the same thing as we had used in cakes the previous week, and decided to pick up some ground coffee with it and compare the scent.

Mirror-based sensory play

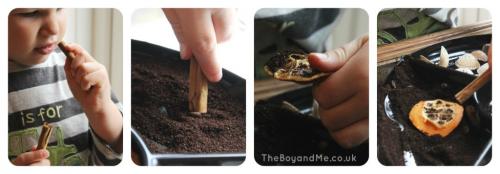
He then became intrigued with mixing and pouring the coffee beans together with the ground coffee. The Boy started using the funnel to pour the ground coffee into the beans but then tried the beans into the coffee instead, he soon realised that they were too big to fit through the hole. The tweezers proved a bit of a challenge for him when trying to pick up coffee beans, turns out rounded objects are a bit tricky! In the end he used his fingers, and then a cockle shell to scoop up the ground coffee, and a cinnamon stick to mix the beans and grounds together. He loved pouring it into the whelk shell, watching it roll around through the spiral and then pour out the bottom.

Fine Motor Skills

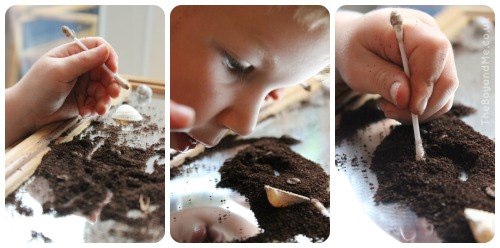
"You make a maze, Mummy. And don't forget the dead ends!"

Pouring the coffee grounds onto the mirror, he chose a cotton bud to trace patterns in and then practised some letter formation. That soon seemed a bit too much like school so he then asked me to draw a maze in the coffee, with the all important dead ends. This is a great way to practise pre-writing skills and the pencil grip. The Boy also noticed that if he looked through some of the coffee into the mirror it looked like he was a different colour.

Pencil grip

"It sounds like music, like clapping. And listen, this is fast like raindrops."

The cinnamon sticks proved a huge hit, in more ways than one! The Boy really liked the sound they made when banged together, and then he decided to pour the ground coffee and the beans to see which made the loudest noise. Of course the best thing that made a sound was the magical seashell that he could hear the sea through!

Mirror-based Sensory Play

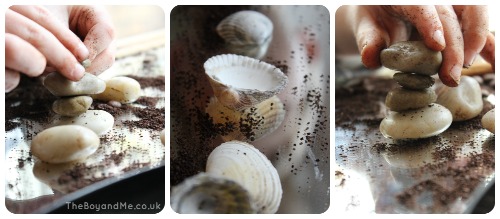
"I want to make a tower like they did on Tree Fu Tom!"

I asked The Boy if he could make a pattern with the shells, I thought he might have made a flower or have sorted them. Instead he laid them out in a row, one up and the next down, repeatedly. Then he asked what he could use the pebbles for, which I turned around on him, and he suggested making a tower and seeing how high it could reach. He very quickly remembered about choosing flat stones to rest on top of each other, and persevered until he managed five high!

Building a pebble tower

I was amazed at how well this activity went with The Boy, especially as I've never given him much sensory play in the past as he doesn't like gloop or mucky hands. This has shown that he can explore the senses without becoming mucky, and that actually he got a lot out of it. I gave it to him when he'd been in from school for about half an hour and, as my husband pointed out, he seemed to find it very therapeutic as it didn't need a huge amount of concentration and he could explore at his own pace and in his own way.

 Mirror-Based Sensory Play

Back To School: Trutex School Uniform

Here's my final post in my series of school uniform review. And appropriately, it is for Trutex, which is the brand of The Boy's embossed school uniform.

We were sent three pieces of school uniform; shorts, trousers and a sweatshirt (the polo shirt in the photographs is another brand).

Trutex school uniform

Both the trousers and the shorts are single pleat pull-on trousers, with no fly or hook fastening and an elasticated waistband at the back. The trousers were available in either black or grey, and came in aged 2-7 years (we chose a size 4 years), and the shorts came in grey from 3-7 years (we choose a size 4 years again). Both are incredibly good quality materials and stitching, and they strike me as being very hard-wearing, something which I'll be reviewing in a few months time. I particularly like that they are just pull-on at this age, as The Boy (like many little ones over the country) becomes so distracted by playing that he needs easy access when toileting and dressing himself.

The sweatshirt is thick, with a soft fleece lining and raglan sleeves. It's worth nothing that the other sweatshirts that I've reviewed have normal sleeves, and that this is the only one with raglan sleeves. I've yet to work out if that helps retain the shape or is more comfortable to wear, but it's interesting to note. The cotton feels thick and hard-wearing, I'll be interested to see the durability of it. The sweatshirts come in a range of colours to suit any school's colours, and sizes go from ages 1-2 years up to 13 years when they turn into S, M, L, XL, XXL, XXXL. My one bug bear with the Trutext uniform is that the sweatshirts and polo-shirts come in 3-4 or 5-6 years. As most children start school aged 4, I don't understand why they don't have a 4-5 years.

Trutex is not available to buy online, as they are the company which most school uniform shops purchase in to resell once embroidered. Find your nearest school uniform stockist via the online store locator. There's clearly a reason why so many shops stock it, and that is because of the consistent quality.

Trutex's ethical trading policy and carbon neutral policy are available online, it's reassuring to see they have signed up to the ETI's Base Code initiative as the other stores have.

I was sent these products for the purpose of this review, my opinion is honest and unbiased.

Carrot Tarte Tatin

I'm always on the lookout for quick and easy vegetarian recipes to whip up, and this a super-easy one which can be prepared in advance and then only takes 15 minutes to cook through before serving with some fresh green vegetables or salad.

Carrot Tarte Tatin

Carrot Tarte Tatin

  • Serves 4
  • Preparation: 30 minutes
  • Cooking Time: 15 minutes

Ingredients:

  • 600g (1lb 5oz) carrots, cut into 2.5 cm chunks
  • 2tbsp clear honey
  • 25g (1oz) butter
  • 1tsp dill
  • optional extra: 150g (5oz) paneer, chopped
  • optional extra: 2tbsp parmesan, grated
  • 350g (12oz) ready-made and rolled puff pastry
  • plain flour
  1. Bring a large saucepan of lightly salter water to the boil. Add the carrots, bring back to the boil and cook for 10 minutes, until just tender. Drain, toss with the honey, butter and dill, and season to taste with salt and pepper.

  2. Preheat the oven to 200°C/400°F/gas mark 6. Spoon the carrots over the base of a 20cm (8 inch) tarte tatin tin or round cake ting with a depth of about 3cm (1.5 inches). Roast in the oven fr 15 minutes or until the carrots are caramelised.

  3. Mix the chopped paneer into the caramelised carrots, and sprinkle 1tbsp parmesan over the top of the mix. This is the point that the tarte can be left covered, to cook through later.
  4. Lay the puff pastry out on a flour worked surface and place the pan on top to draw around it onto the pastry, leaving an extra cm of pastry all the way around the diameter. Place the pastry circle carefully over the carrot (and paneer) mix, and tuck the excess down the sides of the tin to make a border.
  5. Bake in the oven for 15 minutes, or until the pastry is puffed and golden.
  6. Remove the tin from the oven, place a flat plate over the tin and turn over to release the tarte. Sprinkle 1tbsp parmesan over the top of the tarte while it is still sizzling hot, allowing it to melt slightly before serving.

Carrot Tarte Tatin

This recipe comes from the 'Vegetarian Step-By-Step Cookbook' by Parragon. This easy to use cookbook is a fool-proof recipe book that even the most reluctant cooks could use to create vegetarian recipes. Every recipe comes beautifully laid out with a step-by-step guide accompanied by photographs. I am someone who looks at a recipe and becomes flummoxed by the bamboozling instructions; I tend to look at the ingredients and the finished product and charge ahead. This recipe book takes a nervy cook's hand and holds it gently, leading it slowly down the path to good, wholesome, family food. If I can do it, anyone can.

Vegetarian cookbook

I received this book to try out as a Parragon Book Buddy, my opinions are honest and unbiased.


Tasty Tuesdays on HonestMum.com

Link up your recipe of the week

Back To School: Paul Frank Lunchboxes

In the search for the perfect lunchbox for The Boy, we've been trying out a funky, green lunchbox and bottle by Paul Frank, available from Room Copenhagen.

Paul Frank lunchboxes

The brightly coloured, BPA-free, plastic lunchbox measures approximately 15cmx13cmx6cm and is the perfect size for an infant child's lunch, with an easily removable lid that fits back on securely. The two tone water bottle has a cup in the bottom which unscrews easily to provide a drinking cup. The screw top lid would be great to use with a carabiner on a school rucksack. Both the box and the drinking bottle are available in bright green, blue or pink, with the cheeky Julius monkey adorning them.

They're a great fun set which help to make lunchtime bright and attractive.

I was sent this product for the purpose of this review, my opinion is honest and unbiased.

365 #37

Autumn has definitely arrived!

The 365 linky only works because of people linking to it and then contributing their thoughts to others' posts via comments. I can't emphasise this enough, it's the whole point of the linky!

Join in by entering the URL of your favourite photograph of the week (either a 52 or a 365 photo) and show some comment love to everyone else in the community. We've got a Facebook group, and now I've created a collaborative Pinterest board (if you'd like to collaborate, let me know and I'll add you).

  1. Choose your favourite photo from the past week and link it up below.
  2. Please add the badge to your linked-up post so that other people know how to find all the other fabulous entries.
  3. If you can spare five minutes to comment on a few other entries I know they'd appreciate it!
365


Days 251-257 of Project 365

251-257 of 365

251. Reach (A game of frisbee always causes much hilarity and shrieks of laughter. The lawn at Dyffryn Gardens is also a wonderfully sunny place to play it on a lazy Sunday afternoon.)

252. Catch (Trip to the nature reserve after school in order to feed the swans. I took better photos of The Boy feeding the swans, but I love his stance on this one.)

253. Trumpet (He's desperate to learn how to blow a blade of grass like a trumpet, so is Mr. TBaM. In The Boy's case I don't think he has the physical development in his thumbs yet, there's no gap between his joints, so it'll be a few years yet.)

254. Exhaustion (He is so tired every evening, he zonks out at 7.30 and wakes at around 7-7.30 the next morning.)

255. Rise (We got the bread machine out as I'd forgotten to buy bread in the shop. The irony is that we had no milk powder and the flour was heavily out of date, so my husband had to go and buy some from the shop! The Boy put everything into the machine and was fascinated to see it mixing and rising. He went to bed and half an hour later, the machine tripped the electrics twice in two minutes, as well as smelling of burning. Guess who had to go to the shop to buy a tin loaf of bread to make it look like it had worked for The Boy?)

256. Treasure (It poured down for most of the day, so once The Boy has recovered from school we went sploshing with wellies and looking for conkers. They don't look remotely ready to drop, which I'm sure is later than last year? I managed to knock a couple down from a tree but they were still white. We found one conker shell on the ground which had started to open and The Boy was ecstatic to see his first conker of 2013.)

257. Sorting (We've had a very quiet day today, settling into the new routine of doing very little on a Saturday to give The Boy time to recover from his week. He asked to play with the waterbeads and then decided to do some colour sorting with teaspoons once they'd swollen. )

TheBoyandMe's 365 Linky

Why We're Happy It's Autumn

As the wonderfully warm Summer draws to a close in the most spectacularly dreary fashion, I have found myself contemplating which is my favourite season. Surely the blue skies and kaleidoscope of Summer is more of an attraction than the drabness of the colder months?

But with September comes the wonder of the natural world:

Finding the first conker of the year.

Prising it open it to discover that the much longed for and anticipated conker is still white, with just a smidgen of chestnut brown.

But then spotting another one floating in the dammed stream in the gutter.

And there it is, the first shiny conker. The one that no-one in the world has ever seen before.

Why we love Autumn

And then, there's the water.

All the water.

Why we love Autumn

So you can let it beat you, stay in and moan about the incessant rain running in rivulets down the windowpanes. Or you can put on wellies and a mac and go and enjoy all the water.

country kids

Learning for  Life

Back To School: Tesco School Uniform

Over the course of the Summer I've been asked to review several different brands of supermarket school uniforms. It's been a really interesting review process for me as I've been able to examine the difference between the quality, range, fit and price of the uniforms available in four of the main supermarkets.

In this review, I'm looking at the Fred & Florence school uniform range available from Tesco. I have bought quite a bit of clothing from Tesco in the past for The Boy and have always found it to be well made and hard wearing. Essentially I did feel that a polo shirt, trousers and sweatshirt made in Bangladesh or Kenya would surely be much the same as any other on the high street, and wasn't expecting anything outstanding or different to the other uniforms I've reviewed.

The website for the boys' uniform is very easy to navigate and allows for selection under type of clothing, size, colour or price. As a first-time uniform buyer, I was slightly bamboozled by the selection of trousers available, as they all seemed the same quality and style to me, sold singularly or in pairs. I ordered a few different styles of trousers, both pleat and flat fronted, and a two-pack of flat fronted shorts (which The Boy is wearing in the left picture below). The shorts (£5.00 for two pairs) are actually a 3-4yrs size, I was optimistic in hoping they'd fit him but very pleasantly surprised to discover that they did. With an adjustable waist which has been tightened, and a good length in the leg, these shorts are seeing him through the warmer days of Autumn and hopefully last into Spring. The material is soft and not scratchy, but strong and durable.

Tesco School Uniform

I was impressed with the polo shirts (£2.00 for two) as they actually 'hung' well on The Boy and were a good length. I am quite hopeful that they don't end up with twisting hems as I suspect one or two other brands may, and the colour is a nice bright tone. The unisex sweatshirt is amazing quality for £3.00 with ribbed cuffs and hems, and has a soft inside.

The trousers are well cut, a thick material and soft, and with a Teflon® fabric protector which "repels spills and releases ground in stains easily with laundering". The Boy hasn't come home yet with any in-ground dirt, so I can't comment on the repelling properties of the fabric, but they do wash and iron very well. And from £6.00 for two pairs, they are a competitive price.

However, while it would be easy to promote the wonders of the repellant fabric, and paint a picture of droplets of mud and paint flying off at all directions with the forcefield of the mighty Teflon® fabric protector, there is a more important feature that makes the Tesco school uniform stand out above any other material feature.

The 'Buy One Give One' trousers cost between £3.00-£6.00 for one pair. Slightly more expensive than the two-pair packs, but let's face it they are still cheaper than a frappuccino! However, the major selling point of these (and what I think Tesco should be promoting more than stain repellant fabric) is that for every item of uniform bought from this 'Buy One Give One' range, a complete school uniform will be donated to a child in Kenya, Bangladesh or Sri Lanka.

Tesco launched the scheme in 2009 and provided 12,000 children in Kenya with a brand new school uniform to attend school with. In 2010, they expanded the scheme to Bangladesh and Sri Lanka and have given away over 100,000 uniforms to children in these three countries. 100,000 children in some of the world's poorest countries had a new uniform because parents in Britain spent £1 more on their child's trousers.

Surely that is the most appealing factor in the Tesco school uniform?

I was provided with a voucher to purchase items from the school uniform range for the purpose of this review, my opinion is honest and unbiased.

Tesco's Ethical Policy can be found here.

50 Things Challenge: #18 – Create Wild Art

Playing outdoors over the Spring and Summer months is easy and enjoyable for all; it's normally dry, warm at least, and the world is full of greenery to fill the heart and soul. I know that during the Summer holidays we've spent more waking time outdoors than we have in, and have almost forgotten what the television is.

I started in February or March of this year vowing to play outside with The Boy for at least fifteen minutes every day, and we've managed it every day since. So much so that it's now part of our routine and we both feel like we're going stir-crazy if we stay in for too long.

However, with school starting and Autumn (and the other season which shall remain unnamed at present) approaching, play tendencies change; the temperature drops slightly, another layer of clothing is needed, wellies not sandals are the footwear of choice, and sometimes time just doesn't allow for a huge amount of outdoor play. Regardless of all of these factors, our need to reconnect with nature doesn't diminish and it's a well-documented fact that time spent in the great outdoors can have massive benefits for all involved; specifically our children.

So MumOnTheBrink and I had an idea in the Natural Childhood Facebook group to set a challenge to help people continue the National Trust's 50 Things To Do Before You're 11&¾ project during the forthcoming, less-inspiring months.

Each month we will identify one of the 50 Things as a project, and open up a blog-hop for the month to encourage other bloggers to get outdoors and complete their lists.

50 Things Challenge - Create Wild Art

September is #18: Create Wild Art

You could decorate picture frame, make a forest face from mud or air-dry clay, create a beachcombing treasure tile, or a whip up a woodland weaving. There are oodles of other ideas out there too, check Pinterest for some great ideas.

Please enter your wild art activities completed during the month of September into the blog-hop below, Monika and I would love it if you'd copy the code into your post as well as it will spread the word about the 50 Things challenge.

Now pop outside and have fun!


Don't forget to link these up to Coombe Mill's Country Kids weekly; Fiona is the main reason that I continued last Winter to play outdoors before we started working with the National Trust.

Blackforest Gateau

I have a long history of failing to make 'big' cakes in my oven, but when I saw a recipe for a ring cake I remembered that I have a Bundt tin and I decided to have a go at making a cake for my dad's birthday. What else could I make for a man who thinks the 1970s were the best decade ever than a blackforest gateau, but 21st century style.

Blackforest Gateau

Blackforest Gateau

  • Preparation time: 20 minutes
  • Cooking time: 25-35 minutes
  • Serves 8-10

Ingredients:

  • 200g (7oz) softened butter
  • 200g (7oz) golden caster sugar
  • 4 large eggs, beaten
  • 150g (50z) self-raising flour
  • 50g (2oz) cocoa powder
  • ½tsp baking powder
  • 1tsp vanilla bean paste
  • 4tbsp kirsch or brandy (optional and should be omitted if the cake is being given to a minor)
  • 4tbsp cherry pie filling
  • 150ml double cream
  • 1tbsp icing sugar
  • fresh cherries (with the stalks still on if possible)
  • bar of white chocolate
  • dark chocolate curls
  • You'll also need a 20cm (8inch) Bundt tin, well greased and floured (I actually then put mine in the fridge as it was a warm day and the butter was melting through the flour.)
  1. Heat the oven to 180°C/160°C fan, 350°F, gas mark 4.
  2. Beat the butter and golden sugar in a bowl until smooth and creamy. Gradually beat in the eggs, a little at a time, adding flour if the mixture starts to curdle. Stir through the vanilla bean paste.
  3. Sieve in the flour, cocoa and baking powder and beat gently until smooth.
  4. Spoon the mixture into the tin and level the surface. Bake for 25-35 minutes until firm and well risen, test with a skewer which should come out clean.
  5. Place the cake in the tin onto a wire rack to cool. When cool (and not before or the cake will fall apart!) turn upside down and remove from the tin.
  6. Measure a line around the circumference of the cake halfway up the height, and carefully slice through this to have a top and bottom half.
  7. Whip the double cream up until stiff and it holds its shape. Stir through the icing sugar to sweeten. Spread this onto the bottom half of the ring, and spoon the cherry pie filling onto the top of this. Place the top half of the cake back on top.
  8. Melt the white chocolate in a bain marie (or in a bowl over boiling hot water, it shouldn't touch the water). Pour the chocolate over the top of the cake allowing it to dribble down the sides and hole to create. Place the cherries on top, and put the cake in the fridge to set.
  9. Once almost set, sprinkle the dark chocolate flakes on top (if this is done when the white chocolate is still warm, it will melt into it). Return to the fridge to set the white chocolate.

Blackforest Gateau

Mummy Mishaps
Related Posts Plugin for WordPress, Blogger...