Tidy Books Book Box (Review & Giveaway)

Books are an essential aspect of our home, and as I was sorting out The Boy's books after Christmas time I realised that he has very distinctly moved into a new phase of story books. Hardback books are long gone, the amount of text on a page has increased and the font is smaller, and the subject matter is more detailed.

We've also had to find space on his book shelves for his own reading books, those which I've bought him to practise and develop his reading skills. I have in the past tried to keep his books constrained to just the dining room, but when I was sent a new book box to review, it was the perfect excuse to gather all of his reading books together in one place and bring them into the living room.

With an advertised space for up to 40 books and four sections of two different heights, it's the perfect size to sit in the corner of our living room and appeal to The Boy to sit down and flick through a book and have a go at reading it by himself. In reality we actually have a lot more books in the book caddy than that, with over 120 small reading scheme style books in there, we've definitely got something to suit The Boy's moods and improving reading ability.

I set the book caddy up for The Boy one afternoon to explore after school and he found it really enticing. The fact that the books are forward facing is incredibly useful, because actually children do judge a book by its cover, especially if they can't read the title!

Tidy Books Book Box

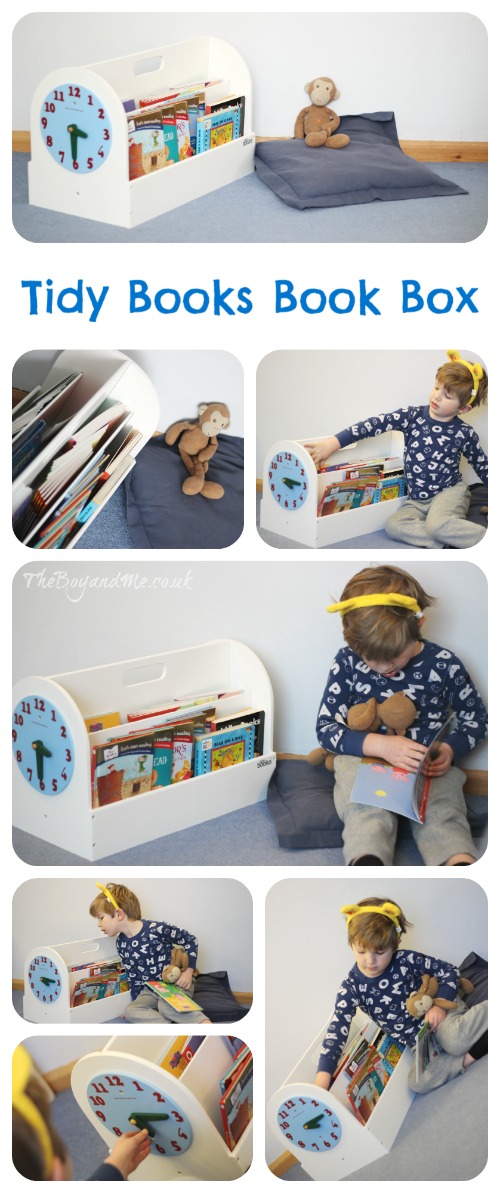
The Tidy Books' book box measures 34 cm (h) x  54 cm (w) x 28cm (d) and had a lovely play clock which can be attached at one end (although it can also be removed when children are older) with moving hands for The Boy to practise reading the time on. Assembly was simple, the book box arrives flat-packed in a carry box, and it took me less than five minutes to put it together with the provided alan key. Made from sustainable wood, not MDF, the book box is also finished in a water-based lacquer which is a safe, virtually odour free lacquer which is better for the environment and is ideal for children and allergy sufferers.

I find it very reassuring that the product has been made in a very responsible manner with sustainable resources and harmless paints. The finish and quality of the product is amazing, there are no sharp edges or splinters of wood on the screw holes, and it's the type of book box which will be used for longer than a few years; I can see it being passed down through the family.

The Tidy Books Book Box is available in a dark petrol blue, white or natural finish, and is priced at £69.00. While that may seem a little more expensive than some cheap high-street alternatives, the comparative quality is indisputable and this is one of those cases where it's worth spending a little more for something that will last years.

However, I am very fortunate to be able to offer a Tidy Books Book Box to one lucky reader of TheBoyandMe. Simply fill in the Rafflecopter form below for the chance to win one.

a Rafflecopter giveaway

I was sent this product for the purpose of this review, my opinion is honest and unbiased.

Chocolate Marshmallow Stirrers

We're huge fans of marshmallows in this household, The Boy adores them in hot chocolate when they turn gooey. These made from scratch marshmallow stirrers are straightforward but do require time and patience, something which I needed a little assistance with from Mr. TBaM!

Chocolate Marshmallow Stirrers

  • Makes: 25
  • Preparation time: 45 minutes (plus cooling)
  • Cooking time: 25 minutes
  • Setting time: 4-5 hours

Ingredients:

  • For the marshmallow:
    • sunflower oil, for greasing
    • 1tbsp cornflour
    • 1tbsp icing sugar
    • 200ml/7fl oz cold water
    • 450g/1lb granulated sugar
    • 100ml/3½fl oz hot water
    • 25g/1oz powdered gelatine
    • 2 large egg whites
    • 1tsp vanilla extract
  • To decorate:
    • 150g/5½oz milk chocolate, broken into pieces
    • hundreds and thousands
  1. Lightly oil an 18cm/7inch square cake tin (at least 5cm/2in deep). Line the base and two sides wih baking paper, then lightly oil the paper.
  2. To make the coating, sift together the cornflour and icing sugar into a bowl. Use a little of this mixture to dust the lined tin, tapping it firmly so the mixture coats the base and sides completely.
  3. Put the cold water and granulated sugar into a small deep saucepan. Heat gently, stirring constantly with a wooden spoon, until the sugar has dissolved.
  4. Bring the syrup to the boil and boil, without stirring, for about 5 minutes until the mixture reaches around 120°C/248°F on a sugar thermometer.
  5. Meanwhile, put the hot water into a small bowl, sprinkle over the gelatine and stir until dissolved and the liquid is clear. Put the egg whites into the bowl of a free-standing electric mixer and whisk until they hold stiff peaks.
  6. When the syrup has reached the correct temperature, remove the pan from the heat and add the gelatine mixture – it will fizz and bubble. Leave to stand for a few seconds, then slowly pour the syrup into a large, heatproof jug (take care because the mixture will be extremely hot).
  7. Switch on the mixer on low speed and gradually add the hot syrup to the egg whites in a slow, thin stream, whisking constantly. This must be done very slowly and carefully, otherwise the egg whites could end up slightly scrambled! When all the syrup has been added increase the speed to high and whisk for 10 minutes until the mixture is thick and glossy and leaves a thick trail on the surface when the whisk is lifted.
  8. Whisk in the vanilla extract.
  9. Pour the mixture into the prepared tin and use a spatula to gently level the surface.
  10. Lightly dust the top with a little of the coating mixture. Leave to set, uncovered, in a cool, dry place for 4-5 hours.
  11. Run the tip of a lightly greased knife along the unlined sides of the tin to release the marshmallow. Using the lining paper, gently lift out the marshmallow and place on a chopping board. Cut into 25 squares with a lightly greased knife. Lightly dust each square with the remaining coating mixture.
  12. To decorate, put the chocolate into a heatproof bowl set over a saucepan of gently simmering water and heat until melted. Remove from the heat and stir until smooth. Leave to cool for 10 minutes.
  13. Gently push a lollipop stick into each marshmallow, or place onto a spoon. Pour over the melted chocolate and sprinkle on hundreds and thousands to coat. Place on a baking sheet lined with baking paper and leave in a cool place to set. Store in an airtight container for up to 5 days.

Chocolate Marshmallow Stirrers

This recipe is one of many scrumptious marshmallow concoctions which can be found in the Parragon book 'Marshmallows Made Marvellous'. With an RRP of £6.00, it's available from a variety of online stores, including Waterstones.

Linking to Recipe Of The Week, Share Your Stuff Tuesdays and Tasty Tuesdays

Winter Sunshine

We love going to the beach at any time of the year, but it's incredibly difficult to find the enthusiasm when it is pouring down, and there's been a terrific amount of precipitation recently! However, last Sunday when the sun made an appearance and reminded us all of how wonderful the Winter sunshine truly is, we set off further down the coast with my brother and his family to explore Ogmore beach.

The main beach was packed but we actually headed around the coastline a few hundred yards to a beach which is a bit tricky to get down to and therefore has less visitors. The point about how tricky (in wet conditions) it is was made when I slipped on the muddy path walking down and ended up with a derriere covered in mud within three minutes of leaving the car!

Winter Sunshine

However once we were down on the beach, the sunshine was warming and the conditions idyllic. We set out our picnic blanket and sat down on the rocks chatting and munching away on pasties and grapes while The Boy and his cousin roamed amongst the rockpools, collecting pebbles and creating some beach art.

Creating Beach Art

As witnessed in many episodes of Doctor Who, this stretch of coastline has a wonderful strata in the cliffs and the beaches are crammed with rockpools galore. The perfect place to find crabs or starfish!

Exploring Rockpools

Ogmore beach is well known for the wonderful array of fossils in the rocks and cliff-face, and under the guidance of my sister-in-law who has been beach schools trained, we all set to the task of finding a variety of fossils. Finding what was once a fish, or a barnacle-like creature, is absolutely amazing and so rewarding; it reminds you of your place in the history of our planet.

Finding Fossils

 —

country kids

365 #05

Welcome to 365 Photo A Day Project linky. This linky covers round-up posts for the week or one of your favourite photos of the week. I've written a post providing tips for completing the project, always ask one of the regulars for help if you're stuck.

The 365 linky only works because of people linking to it and then contributing their thoughts to others' posts via comments. I can't emphasise this enough, it's the whole point of the linky!

Join in by entering the URL of your favourite photograph of the week (either a 52 or a 365 photo) and show some comment love to everyone else in the community. We've got a Facebook group, and now I've created a collaborative Pinterest board (if you'd like to collaborate, let me know and I'll add you).

  1. Choose your favourite photo from the past week and link it up below.
  2. Please add the badge to your linked-up post so that other people know how to find all the other fabulous entries.
  3. If you can spare five minutes to comment on a few other entries I know they'd appreciate it!
365


Days 26 – 32 of Project 365

26-32 of 365

26. Breather (Rubbish day weatherwise and I was nervous about dental surgery the next day so the boys burnt off some energy in the local version of softplay hell! I tried to get the perfect ball-pit photograph, yet 140 photos later it was this one which appealed to me.)

27. Pitter-patter (New photographic challenge: trying to capture raindrops falling, I haven't managed it this time but the patio reflected my mood – flooded. Having had the first bit of dental surgery on Friday (to correct various screw-ups which have plagued my mouth for around three years), my mouth was aching a lot. Just another droplet in the puddle of bad dentistry I've suffered.)

28. Mummy (The Boy has been enjoying drawing pictures on the easel since we brought it back downstairs last week, today was a picture of mummy. I had two belly buttons though. Either that or he'd drawn my nipples down by my waist, not that far off then!)

29. Book worm (Snuggled down on a cushion, The Boy started exploring his own reading books nestled in his new Tidy Books book caddy – competition to follow this week.)

30. Squint (I struggled with the whole damn project today and desperately wanted to just stop. However, the good folk of the 365 Facebook group buoyed me back up again and this is my scrumpybum boy after his bath. This is the day I realised he really needed his hair cut.)

31. 恭禧發財 (Bring on the year of the horse.)

32. Fresh (No editing, just my beautiful boy enjoying a gale force wind on the beach.)

TheBoyandMe's 365 Linky

The GTech Multi (Review)

Before Christmas I was sent the brand new GTech Multi to review. It was a very opportune time to put a new vacuum cleaner through its paces considering the amount of glitter, tinsel, artificial Christmas tree needles (yes, they still drop them like a real one does), food crumbs and tiny pieces of wrapping paper (which seem to multiply) there was around the house. And we really did test it very well, there was a lot of glitter in this house.

We've continued to give it a rigorous testing ever since, mainly because The Boy really likes glitter!

GTech are a relatively young brand when it comes to carpet cleaning, but the expression 'new brooms sweeping clean' really does speak volumes in their case. I have previously reviewed the GTech AirRAM and couldn't have praised it any more than I did for the ease of use, in fact I did a video review where I poured two bowls of 50g of blue sand into my cream carpet, rubbed it in, and then compared the power of my Electrolux vacuum against the AirRAM's suction. As the GTech cleaner actually sucked up all of the 50g, plus another 3g of dirt in my (previously vacuumed) carpet. That wasn't embarrassing at all!

At the time when I reviewed the AirRAM, my only criticism of it was that it didn't have a hose and therefore any attachments to clean the edges or the stairs.

GTech have solved that problem by creating the Multi.

GTech Multi

See there's no cord? That's because it's one of the few cordless and powerful handheld vacuum cleaners around of this quality. With a run time of 30 minutes from charging, the Multi is perfect for cleaning stairs, the car, and all those awkward to reach places around cupboards and piano legs (or is that just my house?). It weighs 1.6kg so it very lightweight and not at all too heavy to use or manoeuvre. It also has a selection of attachments and devices on board to make it easier to clean all areas; long length crevice tool, upholstery tool, dusting brush, extendable hose and an extension tube (available free when ordering directly from GTech).

But the best bit about the GTech are the headlights!

Yes, they have installed headlights on a vacuum cleaner! However silly that initially sounds, the two small LED lights either side of the attachment area make hoovering in crevices, cars and stairs so much easier! They really help to highlight all the dirt and dust which would otherwise be missed.

As the 50g blue sand was such an effective review technique, I decided to repeat it with the GTech Multi. I don't have another cleaner to compare it against, however I wanted to see how much of the sand it could suck up. I actually had doubts that it would manage to be as effective as the AirRAM, purely because of the trigger button feature and the crevice nozzle.

I set to the task with my trusty digital weighing scales and blue sand!

2014-01-31 13.53.05

While it didn't suck up all 50g of blue sand, I can certainly forgive it for missing the 1g (or less) of blue sand that it didn't suck up. Considering how much I rubbed it into the carpet, I felt it was very effective at vacuuming it.

Cleaning the Multi is not quite as straightforward as the AirRAM, but at the same time it's hardly onerous. The clear barrel pulls away from the main machine, the lid unclips and the filter in the middle can be removed very easily to wash out. There is a filter on the lid which should be unclipped and the dust removed from, as this is where quite a lot of fluff can collect. However, the whole cleaning process is quick and simple to do. And, if like my husband, you put it back together the wrong way up, then a red light flashes on the Multi to tell you that the filter is blocked.

We have used it to clean the car, and my husband commented that it made life so much easier that he didn't need to feed the extension cable through the porch window and position the car as close as possible to the house.

Priced at only £149.00 then I think the GTech Multi is an incredibly effective cordless and handheld cleaner.

UPDATE 06/09/14: I have noticed a decline in the power and therefore suction of the GTech Multi I'm sorry to say. I do clean the filter regularly but it doesn't seem to make much difference. It still works for light dirt around the edges of carpets and for cobwebs, but it is now struggling to suck up sand from the carpet in the car. The lights have also stopped working. A real shame for a machine with big promise.

I was sent this product for the purpose of this review, my opinion is honest and unbiased.

365 Photographers: Susan Snaps

Apologies for the break in the series, Christmas and life got in the way!

Project 365 is a wonderful photography used to document daily life and the little moments which are otherwise forgotten. I'm in my fourth year and, aside from an incident yesterday where I never wanted to take another photograph ever again, look back fondly on all the memories. However, there is another wonderous aspect to the project; the community which has sprung up because of it. I feel it's a real privilege to see people's everyday life and families grow and change, especially over the past two years.

I've mentioned before what a pleasure it has been in the past to find a stranger join in on the linky. To find someone from another part of the world, completely unrelated to the UK Parent Blogging world, joining in with the linky is a real surprise, and a joy.

Finding someone from Australia in the linky was a big surprise!

susan snaps

Susan Snaps is one of the most wonderful photography blogs that I've come across. Susan was a journalist but is now a university lecturer, and lives in Brisbane, Queensland. As she has a teenage son who has opinions about his privacy, she doesn't tend to feature him often on her blog. However, this allows her to have a wider subject matter, especially as she can be regularly found wandering around the South Bank amidst the street performers and families picnicking. This makes for wonderful photographs, joy and laughter oozes from every pixel of the screen.

I've tried to narrow my selection of her photographs down to my favourite four, but gosh it was difficult!

Susan Snaps

I've asked Susan in the past if she is a 'stealth photographer' like Stephanie from Point & Shoot The World, but no, she actually engages in conversation with the people she snaps and finds out their story; who they are, what they're doing and gains their permission to use the photos. I love the vibrancy in this photograph of the laughing girl at the all inclusive Springflare festival, combined with the silhouette of the acrobat at the South Bank it goes some way to show its fabulous and cosmopolitan atmosphere.

Susan Snaps

One of Susan's other favourite subjects is birds. She's commented that until she started the 365 Project, she'd never taken a photograph of a bird but now she can't stop. I spent ages trying to decide between the wonderfully colourful parrots and exotic birds, however this image of a common pigeon supping on a public water fountain really appealed to me! Water is another common feature in her 365 photos, and I love the angle of this water feature with the perfect sky behind. Susan has a real talent for capturing moving water, the splash of it tipping over the final spout is beautiful.

These are Susan's favourite six from her two years of Project 365 so far.

Susan Snaps

31/03/2013 – Before the project I had not ever taken a photo of a bird. I don't think I even noticed them. Now it is on of my things and I reckon I'm not bad at them.

Susan Snaps

31/12/2012 – Three things to recommend this photo
1) I survived the first year
2) I love our pool and it features a lot in the project
3) I do get to document a lot of the lives of those important people around me (here my niece Cleo)

Susan Snaps

25/11/2012 – There are a whole pile of community events I would never have bothered to visit if it wasn't for the camera. This one was take at South Bank – a fantastic area in walking distance of my home my go-to place when I'm not feeling very inspired (so about three times a week). I see living so close to such a vibrant, interesting place to be a big bonus for me and my project

Susan Snaps

16/04/2013 – Getting out and about with the camera means you get to know the people in the neighbourhood a lot better. I like that. the best thing about this image is that it was when I took the new puppy in to visit Margaret next door. Conversations with Margaret always revolve around incontinence pads, problems with the hearing aid or doctors' appointments – except when I take Rumple. It's the joy of both of them (plus Rumple is my 365 buddy now. He's normally with me as I walk the streets)

Day 271

28/09/2013 – I read the manual. Well I google searched "How to take photographs of fireworks". I never read manuals so I was really proud of myself for doing so. It's part of the project teaching me better use of my camera.

Susan Snaps

02/10/2013 – I loved this photo so much it is in the process of becoming canvas wall art. It's the sort of reward you get for carry the "proper" camera with you everywhere (and living in a beautiful part of the world).

  • When did you start doing the 365 photo project, and why?

I started on January 1, 2012. I'd heard about it somewhere and decided it was just what I needed.

As background, I work full-time and a family with very high physical and mental health needs. Between us we have a cardiologist, neurologist, two gastroenterologists, two psychiatrists, two psychologists, a development pediatrician and doubtless others I've forgotten. Life can easily feel like an endless procession of work, washing, Woolworths and waiting rooms – if you let it.

I decided that I needed something for myself in all that and some way of finding something different, something special, something beautiful every day.

At first the plan was just the photos with a bit of a caption. In fact on my first post I said "I may comment about it or let the image talk for itself". It hasn't turned out like that. As a former print journalist (now working in a university) the need to write kicked in, and the rambling anecdotes are as important as the photos that loosely inspired them. It's about indulging my creative brain.

  • Why did you decide to continue the project for a second (and third) year?

Basically I couldn't stop. About mid way through the first year I decided I never wanted to take  another photo again. But I was too stubborn to give up. I was counting down the days. But then I realised what a great creative outlet it was and even though we continue a love/hate relationship, I knew I would miss it.

  • What's the best bit about doing a 365 photo project?

For many people it's about documenting a year (or more) in the life of a child and it becomes a precious record where they seem to change every day. I have a teenager and 365 days of sulking in a bedroom would not make for very good material (I joke, but only a bit). He would certainly never consent to that much of his life being recorded and at his age that's fine. For me it's about the creative process. I'm a much better photographer now than I was at the beginning. But mostly if I hadn't made this commitment it would be far too easy for life to get in the way. This gets me out of the house every day looking at the world through fresh eyes and seeing things I would never have noticed before.

  • Are there times when you've wanted to give up, why? What kept you going?

Just about every day. Sometimes it feels like it is too hard to fit it in which is exactly why I need it. I continue because I'm stubborn, because just when I think "right, that's it" someone writes an incredibly lovely comment and because deep down I know I love it and it really is the only thing I do just for myself. It's permission to be selfish.

  • What tips would you give to anyone who wants to start a 365 project?

Remember it's your project. Don't think that because everyone else is taking photos of their child's Easter bonnet you have to or conversely because everyone is taking photos of the Christmas concert you can't. Make your own rules and if some days you have to take a photo of socks just to stay in the game then socks it is. Just take it and move on.

  • Anything else you'd like to add?

I am not a very good 365 buddy. People on the link have been incredibly generous in their time and comments and have spurred me on to keep going and I have not held up my end of the bargain. Every week, I promise myself I'll do better. Every week, life seems to get in the way. That's why communities such as TheBoyandMe are so helpful. They spur you on and let you be you.

How do you see the world around you?

Please pop back next Thursday when I introduce you to another longstanding member of the 365 community; Fun As A Gran.

Teaching Children The Value Of Money (Featured Post)

Recently I've started to say 'no' to The Boy about certain things. In the past if his ask was realistic then I'd automatically say 'yes' and pay for the trip to bowling or a new little toy, however I've started to realise that he is expecting these to come as normal. And while I don't want him to think we're living on the poverty line, or for him to worry about finances (as I did as a child), I do want him to realise that we need to save up for things.

We've started giving him 50p a week pocket money for helping out around the house, and in order to save for a toy he'd really like. He's actually mentioned a few times recently that he'll be able to buy x, y or z with his pocket money (although I'm not sure he'll be able to afford the trip to Legoland as he hopes!).

Read on to find out more sage advice. 

You’re never too young to receive valuable financial advice – at least, that’s according to people in the UK.

Saving and being careful when choosing purchases is the most popular financial advice for people to bestow, recent research from budgeting account provider www.thinkmoney.co.uk has revealed.

If you can’t afford it, don’t buy it

More than a third of Brits advise the spenders of the future to be savvy when it comes to purchases, with 37% citing ‘if you can’t afford it, don’t buy it’ as the most important financial lesson to teach children.

And if you thought that it would be the older generation urging children to save money, you’d be wrong. More than three times as many people aged 18 to 24 (25%) as over-65s (just 7%) said that ‘try to save something each month’ is the most valuable wisdom to impart to children.

What do the children think?

However, a video produced by thinkmoney shows that children have other ideas. Watch ‘Kids and Money’ here to find out what they think.

As you can see, leaving financial decisions in the hands of children perhaps isn’t the wisest idea, with some youngsters estimating the cost of a house at just £1! Guesses as to what their parents earn range from 1p to £5. And it’s clear that the old adage ‘money can’t buy you happiness’ is unlikely to appeal to a child, as if they had all the money in the world they’d choose to buy sweets, chocolate, water pistols and Transformers!

Money lessons for children

As well as ‘if you can’t afford it, don’t buy it’, adults rate ‘always live within your means’ as important advice (23%). Meanwhile, saving every month was cited by 16%, ‘looking after the pennies and the pounds will look after themselves’ by 9%, ‘money can’t buy you happiness’ by 8%, and ‘always try to avoid borrowing money’ by 7%.

All this advice is sound, but when the world is full of endless possibilities and the most important thing you have to worry about is what you’re getting for Christmas, it’s easy to see why children don’t have the same money concerns as adults!

Advice varies according to age group

Interestingly, the advice given out by young people is different to that of older generations. For example, a quarter of those aged 18 to 24 think it’s important that children ‘try and save something each month’, while only 7% of those aged over 65 agree with this. Perhaps this is because they’re already enjoying their pensions and have a different attitude towards the future.

Or perhaps they’ve realised that all the saving they did in their younger days wasn’t as important as living in the moment. The older generation instead favour ‘always live within your means’ as important financial wisdom. This suggests that older people are less likely to borrow money.

Ian Williams of thinkmoney said: "It's funny to see all the ideas that kids come up with about money. It's important to try and show them the value and importance of money from an early age, though, for example by giving them a money box and a small amount of pocket money each week. How you encourage them to use that money is up to you."

In collaboration with thinkmoney

Cheese & Vegetable Puffs

These little crackers are a perfect treat as a canape at a party or as a light snack.

Cheese & Vegetable Puffs

  • Makes: 1 roll of puff pastry makes 6
  • Preparation time: 10 minutes
  • Cooking time: 15-20 minutes

Ingredients:

  • ready-made puff pastry
  • halloumi, diced
  • mixed vegetables to own taste: I used asparagus, carrots, baby sweetcorn, broccoli, red pepper
  • 2 tbsp of crème fraîche
  • a knob of butter
  • grated cheese
  1. Preheat the oven to 200°C.
  2. Cut the puff pastry into six rectangles and lay them on a baking tray.
  3. Prick the pastry over with a fork in the area where the filling will be placed.
  4. Lightly stir-fry the vegetables and diced halloumi for five minutes in the knob of butter.
  5. Stir in the crème fraîche to the mix and place a large spoonful onto the centre of the pastry rectangles.
  6. Sprinkle some grated cheese on top of the vegetable mix.
  7. Place in the over for 15-20 minutes until risen and golden.

Cheese & Vegetable Puff

 —

Linking to Recipe Of The Week and Tasty Tuesdays

Vanish Gold Challenge (Review)

My twitter bio starts with 'part-time teacher, full-time mum'. What I don't include in the description is the housework bit, because quite frankly it's a bit boring. However, as for all parents fitting in the housework and laundry is a weekly battle. When The Boy started school, I vowed that I would have all the laundry done on Fridays so that I actually had the time to spend with him over the weekends, and not be faced with radiators full of drying clothes ready to be ironed on Sunday evening. To that end we invested in a tumble dryer to ensure the job was completed on time. Anything to make life easier!

So imagine my happiness when I was sent a tub of Vanish Gold Oxi-Action to try out…

Vanish Gold Challenge

… and then my consternation when I realised what they wanted me to do with the beetroot.

Now because I am a little stubborn (just like stains) and don't like to do what I'm asked, I decided to deviate from the intended plan of dropping beetroot juice on the gorgeous napkin slightly. Mainly because we don't eat beetroot in our house, and also because I know there are a few more stubborn stains I encounter weekly:

Marmite, baked beans, tomato ketchup, hot chocolate, and of course the assigned beetroot.

Vanish Gold Challenge

Using the Vanish Gold Oxi-Action is very simple and quick; use one heaped teaspoon of the powder mixed with a third of a scoop (provided) of warm water (I found boiled water worked better), and stir for a few minutes. Apply the solution to the entire surface of the stain and use the specially designed nobbles on the back of the scoop to rub the solution into the stain. Then rinse the fabric in a bowl of water and wash as normal.

As you can see above the stains were pretty stubborn and offensive, the oxi-action solution bubbled and fizzed well in the scoop and rubbed in well to the stain. I put the napkin in the machine straight away on a normal 40°C wash and this was the result:

Vanish Gold Challenge

As good as new!

Of course, the true test of anything sent for review is when you need to use it genuinely because your mother didn't tell you that The Boy had spilled hot chocolate down the arm of his school sweater. And she didn't put it in to soak. And it just went in the machine and the stain was then 'set' in.

That's just what you want to find on a Friday evening at 9pm when you're doing the ironing.

Not.

Vanish Gold Challenge Hot chocolate

See? Vanish Gold Oxi-Action really does work wonders!

If you've got a stubborn stain that just won't shift, pop over to Vanish Tips for some handy hints and guidance.

I was sent these products (and have received a fee for my time) for the purpose of this challenge, my opinions are honest and unbiased.

Related Posts Plugin for WordPress, Blogger...