How To Make A Stick Raft (#43)

Making a raft is an easy activity to do with children, although their age determines exactly how much input you give. The Boy is four years and two months old and quite good with fiddly and intricate things, but making this raft was more about him helping me, than me helping him. Now he knows how to do it, the situation will reverse.

This activity is completely organic, both in the way that it happened, and the materials we used!

How To Make A Stick Raft

You'll need:

  • 4 sticks of equal length for the frame
  • around 8-10 sticks of the same length as those for the frame to create the bed of the raft
  • long grass reeds/stems
  • 1 large leaf or a frond of leaves for the sail
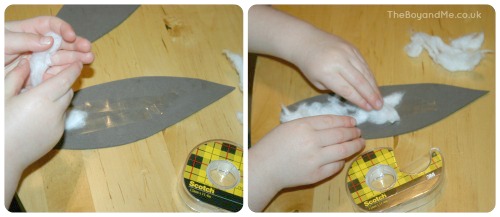
  • 1 stick for the mast
  1. Lay the four sticks for the frame on top of each other to judge size. Carefully wind a long grass reed around each of the join, overlapping and winding from one corner to the other. This will hold them in place. Complete for each corner.
  2. Once the frame is completed, fix each stick to the frame to make the bed of the raft, winding the grass over in a cross fashion as above. Continue until the base is covered, there will be gaps in between each stick.
  3. Use one stick as the mast and a large leaf as the sail. Make two small holes to push the mast through. We actually tied a large frond of leaves to the mast instead.
  4. Insert into a gap in between two of the sticks, carefully wrap grass around to fix it into place.
  5. The raft is ready for sailing!

How To Make A Stick Raft

  • This activity is great for:
    • fine motor skills and hand-eye co-ordination; winding the grass around the sticks.
    • design skills; How can we join the sticks together?
    • problem-solving; Did the raft float or sink? Why? Did it get caught on anything?
    • communication; questioning and discussion.
    • self-esteem; achievement!
    • having FUN!

It is also one of the activities on the National Trust 50 Things To Do Before You're 11&¾ list: #43: Build A Raft!

Country Kids


Beach Craft: How To Make A Shell Shaker

We spend a lot of time on the beach at all times of the year, but especially during the warmer months of the year. And just like all children, The Boy likes to collect shells.

Lots of shells.

And it comes to a point when we have to start finding things to do with them.

So this weekend, we collected up shells with holes in them and we made a musical instrument with them!

How To Make A Shell Shaker

You'll need:

  • a 'Y' shaped stick
  • a variety of shells with holes in them (do try and collect different types so that you can discuss the names of them)
  • string
  • something to cut with
  1. Tie one end of the string to one of the 'Y' twigs. Wrap it around several times to make it stronger and also to hide the end of the string. Make a simple knot to fix it into place.
  2. Thread the shells onto the string, alternating the different types and the way that they are facing.
  3. Pull the string taut and wrap it around the other end of the 'Y', making a small knot to hold it in place. Wrap it around several times, tying it off tightly.
  4. Shake, shake, shake!

How To Make A Beach Shell Shaker

Country Kids

Tuesday Tots


How To Make Pirate Party Bags

When The Boy had his pirate party recently, I decided that plastic 'loot' bags weren't going to cut it for authenticity so I bought some hessian fabric from eBay and made my own loot bags.

Pirate Party Bags

The hessian was neatly woven along one side already, which is the side I used for the opening. Each bag measured 15cmx25cm, requiring a rectangle of hessian measuring 33cmx27cm which was folded over and stitched along the one side and base using a sewing machine. I tied the bag using natural garden twine.

I'm a stickler for party bags at children's parties and hate most of the cheap tat that comes in them; I'd rather spent 25p more a bag for some relevant and quality items than give something which is pointless. Cheap sweets and plastic toys are a waste of the host's money, and are usually forgotten within half an hour of the party.

With clever shopping and a bit of time, quality and relevant contents for a party bag can be found in supermarkets, pound shops and craft stores. eBay is also brilliant for party bag contents!

Pirate party bags - loot

Inside each bag there was:

  • a treasure chest (decorated by the children during the party as one of the activities) – Baker Ross
  • a pirate pencil – Wilkinson's sale section
  • a working compass – Asda
  • a party blower (pirate themed) – Wilkinson's
  • a maze (pirate themed) – Wilkinson's
  • pirate stickers – Asda
  • chocolate coins – saved from Christmas when they're a lot cheaper!
  • bubbles (pirate themed) – Wilkinson's

The hessian bags worked out exactly the same price as a standard bag. The fabric was £2.49 a metre and I made ten bags out of half of the fabric which meant they cost 12p each. The items listed above were between 10p-25p each. The treasure chests were the single most expensive item at 99p each, but they were also one of the activities that the children did during the party so have a dual purpose with cost. The total cost of each bag (without the chest) was £1.12.

How To Make Pirate Bunting

How to make pirate bunting

We're fortunate enough to have a perfectly south-facing garden and a son born in the Summer. This tends to mean that we are able to utilise the garden for his parties and bedeck the trees and bushes with bunting and balloons.

(That's the theory anyway, but on his second birthday there was a near monsoon outside in south Wales, and his third was in a church hall because it had rained for the fortnight before and I wasn't taking any chances.)

However, one of the things that I adore in the Summer months is seeing brightly coloured bunting draped through trees, and although we have 50 metres of home-made Very Hungry Caterpillar bunting from his first birthday, I felt that we needed some new flags for his fourth birthday; a pirate-themed party.

I did some research and found a huge selection of red, white and black fabrics suitable for pirate bunting from a variety of online shops and Ikea.

How To Make Pirate Bunting

More specifically the fabrics I bought were:

Using this Pirate Bunting template, I traced out the triangles of fabric and cut them out using pinking shears (prevents the edges from fraying and saves time on stitching them too). For each 5 metre length of ribbon, I had nine different fabrics and used three of each. I laid them out in a pattern which meant there was a good contrast of red, white and black, along with alternating patterns and stripes.

Pirate Bunting flags

Next job was to pin them on to the ribbon. I used 5 metre lengths to make it more manageable with sewing and untaggling, and had a 15cm strip of ribbon free at either end for tying onto the tree or fence post. I left a 1cm gap in between the triangles and pinned three complete repetitions along the 5 metre length. After pinning the triangles into place, I used the sewing machine with red thread to stitch them into place.

How To Make Pirate Bunting

In total I made thirty metres of fabric to string around the garden for his pirate party, very jolly!

How To Make Pirate Bunting

Beachcombing Treasure Tile (100 Days Of Play)

One of activities on the old '50 Things To Do Before You're 11&¾' list was 'hunt for treasure on a beach'. That may no longer be valid for the 2013 list, but it is still an excellent activity to do with children and even more so for us as we live in a coastal town. It also seemed the ideal play activity to do with The Boy for the exciting blog hop I'm taking part in (organised by Sun Scholars & Life at the Zoo) called '100 Days of Play'. The idea of the blog hop is to feature 100 different play based activities from bloggers all over the world; one a day, every day, for a 100 days.

Beachcombing Treasure Tile

We like popping down to the beach, and go every Thursday once I get home from school. On our predominantly pebble beach there is always a plethora of treasure to be scavenged; eagle eyes are definitely needed to 'comb' the grey pebbles for the different and occasional glints of seaglass or shells. This time I decided to make a relief tile of the treasure that we found, by using airdry clay and pushing the discoveries into the tile to hold them firmly in place.

I used a takeaway (tupperware) container to hold the airdry clay, this was also useful to clip the lid into place to prevent damage while transporting it home. I also made two holes near the top to tie the string through once it had dried.

We spent a good amount of time looking for fossils in the stones (not many in our area), interesting rocks with patterns in the composition, shells (both barnacle and snail type shells), and seaglass. There's a fair amount of seaglass around our way from the times when Britain was not so caring of the environment. Eroded by time, waves and rocks; the seaglass has an opaque appearance with all rough edges worn away. Occasionally you can find a piece with lettering or numbers on it, as The Boy did, and we came up with a great story of it belonging to a pirate.

Beach Treasure Tile

This is the type of activity that doesn't have to be limited to a beach, it would be just as good in a woodland for example. The only issue there is that over time the items found in a woodland will rot, but for the short term it would work just as well. It could even work for a box of magic buttons or trinkets collected over time and from different generations.

It's also an excellent resource for storytelling, as mentioned above; the reasons and back-stories to the different treasures could be fascinating and an excellent form of oracy development.

100 Days Of Play Blog Hop

Sharing simple ideas on how to connect with your children through play!

New ideas shared each day from 1st April – 20th July 2013.

100 Days of Play is brought to you by these wonderful bloggers:

SunScholars . Frogs, Snails & Puppy Dog Tails . Playful Learners . Train Up a Child . Fantastic Fun & Learning . Scribble, Doodle & Draw . Learn. Create. Love. . Mom to 2 Posh Lil Divas . Nothing if Not Intentional . My Little 3 & Me . Buggy & Buddy . Sun Hats & Wellie Boots . Twodaloo . True Aim . The Educators' Spin On It . Blog Me Mom . Life At The Zoo . Putti's World . Kitchen Counter Chronicles . Triple T Mum . Busy Kids Happy Mom . Crystal's Tiny Treasures . Rainy Day Mum . Momma's Fun World . My Little Bookcase . Craftulate . One Perfect Day . MumCentral . Artchoo! . Creative World Of Varya . Simple. Home. Blessings. . JDaniel4's Mom . NurtureStore . Me & Marie Learning . Child Central Station . Mamas Like Me . Mama MissMaking Boys Men . Powerful Mothering . Craft to Art . 3 Dinosaurs . Domestic Goddesque . Lessons Learnt Journal . Royal Baloo . Smiling Like Sunshine . Adventures at Home with Mum . B-Inspired Mama . PragmaticMom . Eazy Peazy Mealz . Gluesticks . TheBoy&Me . Learning is Messy . My Nearest & Dearest . Growing Book by Book . How to Run a Home Daycare . Here Come the Girls . Think Magnet . Dandelions Picked . 123 Homeschool 4 Me . Our Ordinary Life . Parenting with Professor Poppins . 2 Little Hooligans . Fun-a-Day! . The Non-Martha Mamma . Angelique Felix . My Very Educated Mother . Creative Playhouse . Go Explore Nature . Zing Zing Tree . Sense of Wonder . Childhood 101 . Crayon Freckles . KZ & Me . Serenity You . This Mumma's Life . Leapfrog & Ladybugs . Blue Bear Wood . Growing Together . KC EDventures . Mommy Lessons 101 . Nature & Play . Like Mama Like Daughter . Mums Make Lists . From Wine to Whine . Messy Kids . Babble Dabble Do . Sugar Aunts . Teaching @ Home . Preschool Powol Packets . Clothed in Love . Curiosity Creates . The Magnolia Barn . Strong Start . Stay-at-Home Mom Survival GuideLearn with Play at Home . Mummy… Mummy… MUM! . Science SparksToddler Approved . Thrive 360 Living . Rockabye Butterfly . Mud Hut Mama . Coffee Cups & Crayons . Playing with Words 365 . My Lil Love Bugs . Creative Connections for Kids . LalyMom . Love, Play, Learn . Kindergarten & Preschool for Parents & Teachers . The Pleasantest Thing . Teach Beside Me 

The Weekly Kids Co-Op

Small World: Building Site

Since discovering how good our Step2 water table is as a centre for Small World play, I've been keen to come up with different scenarios to stimulate his imaginative play. Using Happyland style toys has always been difficult for him, as it is for many other children. Contrary to popular belief children don't always know how to play, especially with imaginative toys promoting role-play; they do need guidance to show how they can re-enact situations they encounter. And likewise the benefits of Small World play are massive as it allows them to work through stories from books, real-life events or the concepts on a television programme for example.

When I set out a Small World scene, I usually have the characters doing something which prompts The Boy to continue their actions and provides a play opportunity straight away. I allow him to play freely for a short amount of time first of all before stepping in and (teacher talk now) 'facilitating his play', gently guiding the direction and providing him with scenarios to process. We play together for another five-ten minutes and then I step back and let him play freely.

He's still not great at engaging to be honest, and that might just be because he isn't geared towards imaginative play at the moment. However, I'm not going to stop providing him with the opportunities and encouraging him.

Small World: Building Site

I have used the Happyland construction site we've had for some time, along with a few other diggers that we have, and placed the crane on the lower level. I poured sand all around the bottom to hide the plastic base, then put sand on the upper level and a pile of gravel (this is actually spare fishtank gravel) in a corner to be moved by the diggers. I placed the various play figures and vehicles around the table, engaging each on in an action.

Small World Building Site

He had great fun with this and spent ages scooping up the gravel, pouring it into the back of a vehicle and then transferring this down to the crane.

In total this activity took ten minutes to set up, and provided hours of fun.

How To Make An 'Under The Sea' Picture (Using Post-It Notes)

As a teacher I know only too well the worth of a sticky bit of paper for note-making. Before I had The Boy, my desk was organised with coloured Post-it notes, and they are also an excellent resource to use in lessons during collaborative discussion work.

However, I'd never thought of using them to create a piece of art with The Boy until I was asked by 3M to see what I could do with their new Post-it Notes Colour Cubes, packs of Post-it Notes in a range of vibrant hues. They sent me a selection and a canvas and asked me to get creative on a "miserable rainy day when no one wants to go outside!" How fortuitous that today happened to be just one of those days.

 post-it notes colour cube

So faced with this wonderful range of bright coloured Post-it notes, mostly shades of blue, The Boy and I decided to make an 'Under The Sea' picture.

  1. First, we layered the different shades of blue all over the canvas (we did have to use a small amount of PVA glue as the canvas was the most resistant surface in the world!)
  2. We also used the smaller packs of Super Sticky fully adhesive Post-it notes to add some variation in the colours.
  3. Next we ripped up the different shades of green to make seaweed and underwater foliage and layered these from halfway down to the bottom, overlapping to add depth.
  4. Finally I used the brightly coloured pink, orange and yellow Post-it notes to create some fish, by drawing a design on the back and cutting them out. The Boy then placed these in between the leaves and swimming freely about in the water.

Post-It Notes Colour Cube
And there we have it; one canvas (or piece of card), a selection of Post-it notes in different colours, one hour and one very happy little boy.

post-it note art
If you're looking for some more ideas on creating art with sticky bits of paper, have a look at the Post-it UK Facebook page, which includes some excellent examples.

This is a sponsored post in connection with 3M.

Car Painting & Small-World Car Wash

The Boy loves painting and I try often to vary the equipment I give him so that he is able to experience the way that paint works and how it can be manipulated. We've used the traditional brushes, delved into printing with sponges and making our own tile prints, and about a month ago I decided to see what he thought of using his little Hot Wheels cars to make patterns.

To prepare for some free painting play, I:

  • put out three dishes out for him with green, yellow and blue paint in,
  • gave him a variety of different small world vehicle,
  • taped down an eight foot length of paper onto the kitchen floor.

We had great fun investigating the different tyre tracks on each vehicle, testing to see which was the most effective coloured paint for getting distinct tyre prints onto the paper, and even bordered into some science when we realised that the heavier vehicle were more effective at leaving tyre patterns. The Boy loved looking to see how the wet paints were crossing over and mixing to create new shades of green, etc. In total we spent about an hour zooming the cars back and for; the artwork is still taped to my kitchen wall because I love the colours in it so much.

Painting with toy cars

I'd already thought about the fact that I didn't want to be spending ages scouring his car afterwards, and had enlisted the help of some basic cleaning sponges and his Step2 water table to create a car wash for him. One of the simplest activities that he likes to do is go to the car wash and see the coloured foam squirt all over the car before various brushes, rollers and sponge strips clean the car.

I decided to recreate this using:

  • cheap shaving foam
  • a few drops of food colouring
  • Blu-Tack
  • double-sided tape
  • sponge scourers
  • round plastic scourers
  • a thin sponge wipe (which I cut long strips into to create the drying and buffing curtainat the end of the car wash, we call them the 'kisses')
  • Playmobil figures

The Step2 water table we have has two different levels with a slope connecting them. I filled the top level with shaving foam and a few drops of food colouring to create the foam of a car wash. Near to the entrance of the slope to the lower level I Blu-tacked some round plastic scourers, and at the top of the sponge I placed some sponge scourers; both designed to rub the dirt off. At the bottom of the slope I hung the sponge wipe 'curtain'. The lower level of the table was filled with water to rinse the cars off.

I placed a few of his Playmobil figures at strategic points with small sponges in their hands and invited him to clean his paint-laden cars off.

Small World car wash

The Boy happily played with his car wash for well over another hour, in fact he got his cars covered in paint repeatedly so he could wash them all off again. Water play is always such fun but sometimes he gets bored when it lacks focus. He also won't go anywhere near messy play if I present it to him as a dedicated messy play activity. However, the format of the car wash enabled him to experience both messy play and then wash the shaving foam off in the water if it became too much for him to bear.

Car Painting & Small World Car Wash

How To Make An Easter Bunny Mask

I've got a whole load of Easter crafts on the go at the moment, it's a really fun time of year for creativity. When 3M Scotch set us a challenge to create some Everyday Magic at Easter with the children by working on an Easter craft challenge using the Scotch Brand products, we decided to make an Easter Bunny mask. The Boy is never that keen to wear a bonnet, but loves the idea of pretending to be the Easter Bunny and he's been practising his bunny hops for weeks now!

How To Make An Easter Bunny Mask

You'll need:

  • cotton wool
  • pink or white pipecleaners
  • brown foam sheets (pink would also work, as would felt or thick card)
  • white foam sheets
  • pink foam sheets
  • ribbon to tie (or elastic)
  • double-sided tape, sticky tape strips, superglue (PVA doesn't stick well on foam)
  • scissors (these are precision scissors from Scotch 3M)

How To Make An Easter Bunny Mask

1. From the brown foam, cut out two long ears and a face shape, just the top half of the face will do. Position this over your child's face and use a pen to make on where their eyes are, remove and cut eye holes.

2. Cut a 'snout', eye shapes out to surround the eye holes, and two buck teeth from the white foam.

3. Cut a nose from the pink foam.

How To Make An Easter Bunny Mask

4. Put some strips of double sided tape on the inner part of the ears, and stick fluffy cotton wool on. The double-sided tape works better on foam than PVA glue.

How To Make An Easter Bunny Mask

5. Use the superglue to glue the 'snout' and eye surroundings onto the main mask. This should be done by ADULTS, take care with superglue and follow the instructions carefull.

How To Make An Easter Bunny Mask

6. Place double-sided sticky tape over the cheeks of the bunny's face, and cover this with more fluffy cotton wool.

How To Make An Easter Bunny Mask

7. Place a strip of double-sided sticky tape on the centre of the white 'snout' and put the middle of the pipecleaners onto these close together, pressing them down firmly. Cover this with a strip of sticky tape.

How To Make An Easter Bunny Mask

8. Put a generous dollop of superlue over the centre of the whiskers and push the pink nose on top of this. Again ADULTS ONLY, The Boy is not touching that superglue, he's just pointing to the nose.

9. Make a small hole either side of the mask, about an inch in, and thread pink ribbon through and tie it. You could also use elastic for this.

How To Make An Easter Bunny Mask

For more information on 3M Scotch products, please visit their Facebook page.

This tutorial is sponsored by 3M Scotch who also sent a selection of 3M Scotch products to help complete my own project.


Sunday Showcase


Sensory Play: Lights & Waterbeads

Waterbeads are an excellent play resource to aid sensory stimulation and promote scientific exploration with preschoolers. They're also really good fun!

Waterbeads are tiny hard beads which when immersed in several litres of water, swell and absorb the water. They grow from 1mm across to the size of a pea, are soft and squidgy when touched, bouncy when dropped on the floor. Really bouncy! More commonly used in flower arrangements by florists, they are also a great resource for play, and are non-toxic (just make sure they don't taste-test them!).

I'd seen a few ideas on Pinterest involving lights and waterbeads; several used lightboxes and waterbeads, others used fairy lights. I'd also seen several ideas involving the plastic resuable eggs which are popular at Easter time for egg hunts and available from pound shops.

I bought some small submersible lights and soaked up a kaleidoscope of waterbeads. Into each plastic egg I placed a light and a handful of mixed colour beads, then put them with other beads and some loose water into a plastic tray for The Boy to explore, then turned the lights off and invited him in to play!

waterbead play

He was enthralled with the light shining through the waterbeads, the different colours that could be seen and the way the rainbow effect could be altered. As he's not one for messy play, this is a gentle nudge in the right direction for him with the beads feeling wet but not gloopy.

We discussed why the lights could shine through the waterbeads and I introduced the term 'translucent' to him, we then investigated what else the light could shine through and if coloured items altered the light. It's also a great activity for developing fine motor skills through opening and closing the eggs, twisting the lights on and picking up the water beads.

I bought both the waterbeads and the lights from eBay, both are reusable as the batteries in the lights can be replaced and the waterbeads can be dried out and reused.

Safety note: Waterbeads swell up in water or equivalent liquid and they can grow quite large. This makes them incredibly bouncy, and easy to roll into corners to be discovered at a later date by a curious child. Please take care to prevent these being swallowed as they can be harmful (even though they are non-toxic).


Sunday Showcase

Related Posts Plugin for WordPress, Blogger...